What You'll Learn
Learn how Stable Diffusion converts text prompts into images through tokenization and embeddings, plus six practical techniques for writing effective prompts including emphasis, positioning, and model-specific strategies.
Video Walkthrough
Prefer watching to reading? Follow along with a step-by-step video guide.
How to Write Fail-Proof Prompts for Stable Diffusion
Writing prompts for a Stable Diffusion model can be both easy and extremely nuanced. It’s challenging to predict precisely what will work for the type of images you want to generate. What may make sense for photorealistic images may not apply to anime images.
Varying the model, sampler, CFG scale, etc., only complicates this.
So what can you do? Understand what is happening behind the scenes and how the model generates images.
Want to see prompt engineering visualized? Watch our video that walks you through all the core components of writing a good prompt.
What is a Prompt?
At the highest level, a prompt is simply a way to tell the Stable Diffusion model what type of image you would like to generate. It is a short piece of text, typically around 75 words in length.
But What Really is a Prompt?
Important Disclosure: Before we get started, you should know that I am neither a mathematician nor a computer scientist. This is only my understanding as a passionate enthusiast.
While it may seem magical that you can generate images from a short piece of text, there is a lot of code being executed behind the scenes.
When you type a string of text into the prompt box, the text provided is converted into tokens. Tokens are a way for the computer to understand words or parts of words as numbers. Generally, one token is roughly ~4 characters in length.
If you were to convert the word “cat” into a token, it would be as follows:
49406:<|startoftext|> 2368:cat 49407:<|endoftext|>
Now of course, prompts aren’t just single words, instead, they may be longer like “a photo of a tyrannosaurus rex, in a field, with a cat”. This would be converted into a series of tokens that would look something like this:
49406:<|startoftext|> 320:a 1125:photo 539:of 320:a 46921:tyran 578:no 22118:saurus 10904:rex 267:, 530:in 320:a 1570:field 267:, 593:with 320:a 2368:cat 49407:<|endoftext|>
As you can see, the entire sentence is broken into smaller parts with each word that may contain multiple tokens. For example, the word ‘tyrannosaurus’ is broken up into multiple tokens: ‘tyran’, ‘no’, and ‘saurus’. Punctuation may also be broken into separate tokens, such as the comma after ‘rex’.
Furthermore, tokens 49406 and 49407 are special tokens that indicate where the text starts and ends – so a total of 77 tokens are sent with each request. If your prompt is short, the |endoftext| token will be added to the end until the prompt reaches 75 tokens in length.
If your prompt is longer than 75 tokens, it will be truncated to 75 tokens. Automatic1111 WebUI chunks prompts longer than 75 tokens into multiple requests – this is why you may see the token count jump to 150 tokens if you exceed 75 tokens.
But this isn’t enough to generate an image yet. Once your words are converted to tokens, they are then passed through an embedding layer that converts the tokens into a high-dimensional vector with 768 dimensions:
tensor([[[-0.3884, 0.0229, -0.0522, ..., -0.4899, -0.3066, 0.0675],
[ 0.0290, -1.3258, 0.3085, ..., -0.5257, 0.9768, 0.6652],
[ 1.1565, 0.1318, 0.7895, ..., -2.1024, -1.1519, -0.3311],
...,
[-2.3410, 0.2369, -0.8089, ..., -1.9324, 1.2160, 1.4468],
[-2.3408, 0.2373, -0.8149, ..., -1.9210, 1.2092, 1.4496],
[-2.2778, 0.2738, -0.7739, ..., -1.9037, 1.2449, 1.4263]]],
grad_fn=
This is where the magic happens. The embedding layer is trained to understand the relationship between words and the context of the words around them.
So back to our previous prompt, “a photo of a tyrannosaurus rex, in a field, with a cat” the model would take the tokens for each of these words and their context, translate them into vector space, and then, through a series of complex transformations, understand the relationships and attributes associated with each term, such as the texture of the cat’s fur, the typical shape and features of a tyrannosaurus rex, and the way these elements might interact in a physical space.
The model can then use this understanding to predict the visual elements required to compose the image you’ve requested.
Ultimately, it may generate an image that looks something like this:
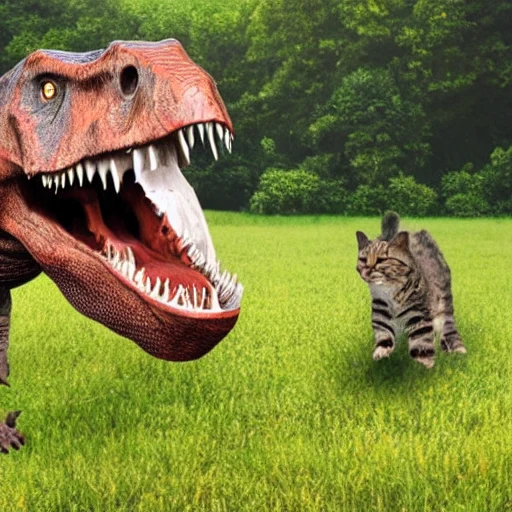 While the image quality isn’t great due to the reliance on a base 1.5 model – it still visually gets the right elements.
Very cool, right?
For further reading, I strongly recommend this blog post by Simon Willison. There he does a terrific job of explaining embeddings in a way that is easy to understand.
Furthermore, I have a Jupyter Notebook available if you want to try playing with this on your own machine.
How Training Impacts Prompts
Admittedly, knowing how a prompt is converted to an embedding is only half the battle. The other half is understanding how the model was trained to understand images.
When Stable Diffusion trained their models, they used different CLIP models to guide the training process. CLIP, or Contrastive Language–Image Pre-training, is a neural network that efficiently learns visual concepts from natural language supervision.
What does this mean in plain terms?
It means that the CLIP model was shown a vast array of images paired with descriptive text. It learned to understand and predict the relationships between words and pictures. This is a form of supervised learning where the model gets better at making predictions based on the feedback it receives, adjusting its internal parameters to minimize the difference between its predictions and the actual outcomes.
So let’s relate this to Stable Diffusion models. While we wrote an entire comparison between the notable releases, we are going to only look at how they were trained to understand images.
- 1.x models were trained using OpenAI’s CLIP ViT-L/14
- 2.x models were trained using LAION’s OpenCLIP-ViT/H
- XL models were trained using a combination of CLIP-ViT-L and OpenCLIP-ViT/G
Each of these models has different ways of understanding the world, and as a result, they generate images with varying characteristics.
Think of it like people who speak different languages.
The word “dog” in English refers to that furry little creature that barks and is a common pet. But in other languages, there are different words for ‘dog,’ for example, “perro” in Spanish or “chien” in French. Similarly, each CLIP model has its own ‘language’ or way of interpreting visual concepts based on the data it was trained on.
This is why people were so frustrated when Stable Diffusion 2.x came out because copy/pasting prompts simply didn’t work as expected.
Therefore, when writing your own prompts, it largely depends on the model you are using and its capabilities in understanding your words.
1.x models that use CLIP ViT-L/14 tend to work better with shorter meanings (e.g., 1girl, best quality, grassy field), whereas 2.x models with OpenCLIP-ViT/H perform better with more expressive prompts (e.g., a photo of a woman standing in a grassy field).
Negative Prompts
While the prompt to describe your image is important, equally so is the prompt to describe what you don’t want to see. This is known as a negative prompt. Negative prompts help to refine the output by explicitly instructing the model on what to exclude. For instance, if you do not want any modern elements in a historical scene, you could use a negative prompt such as “modern clothing, modern buildings, cars, electronics”.
By using negative prompts, you can achieve a higher degree of control over the generative process and ensure that the generated image aligns more closely with your vision.
Seeing CLIP in Action
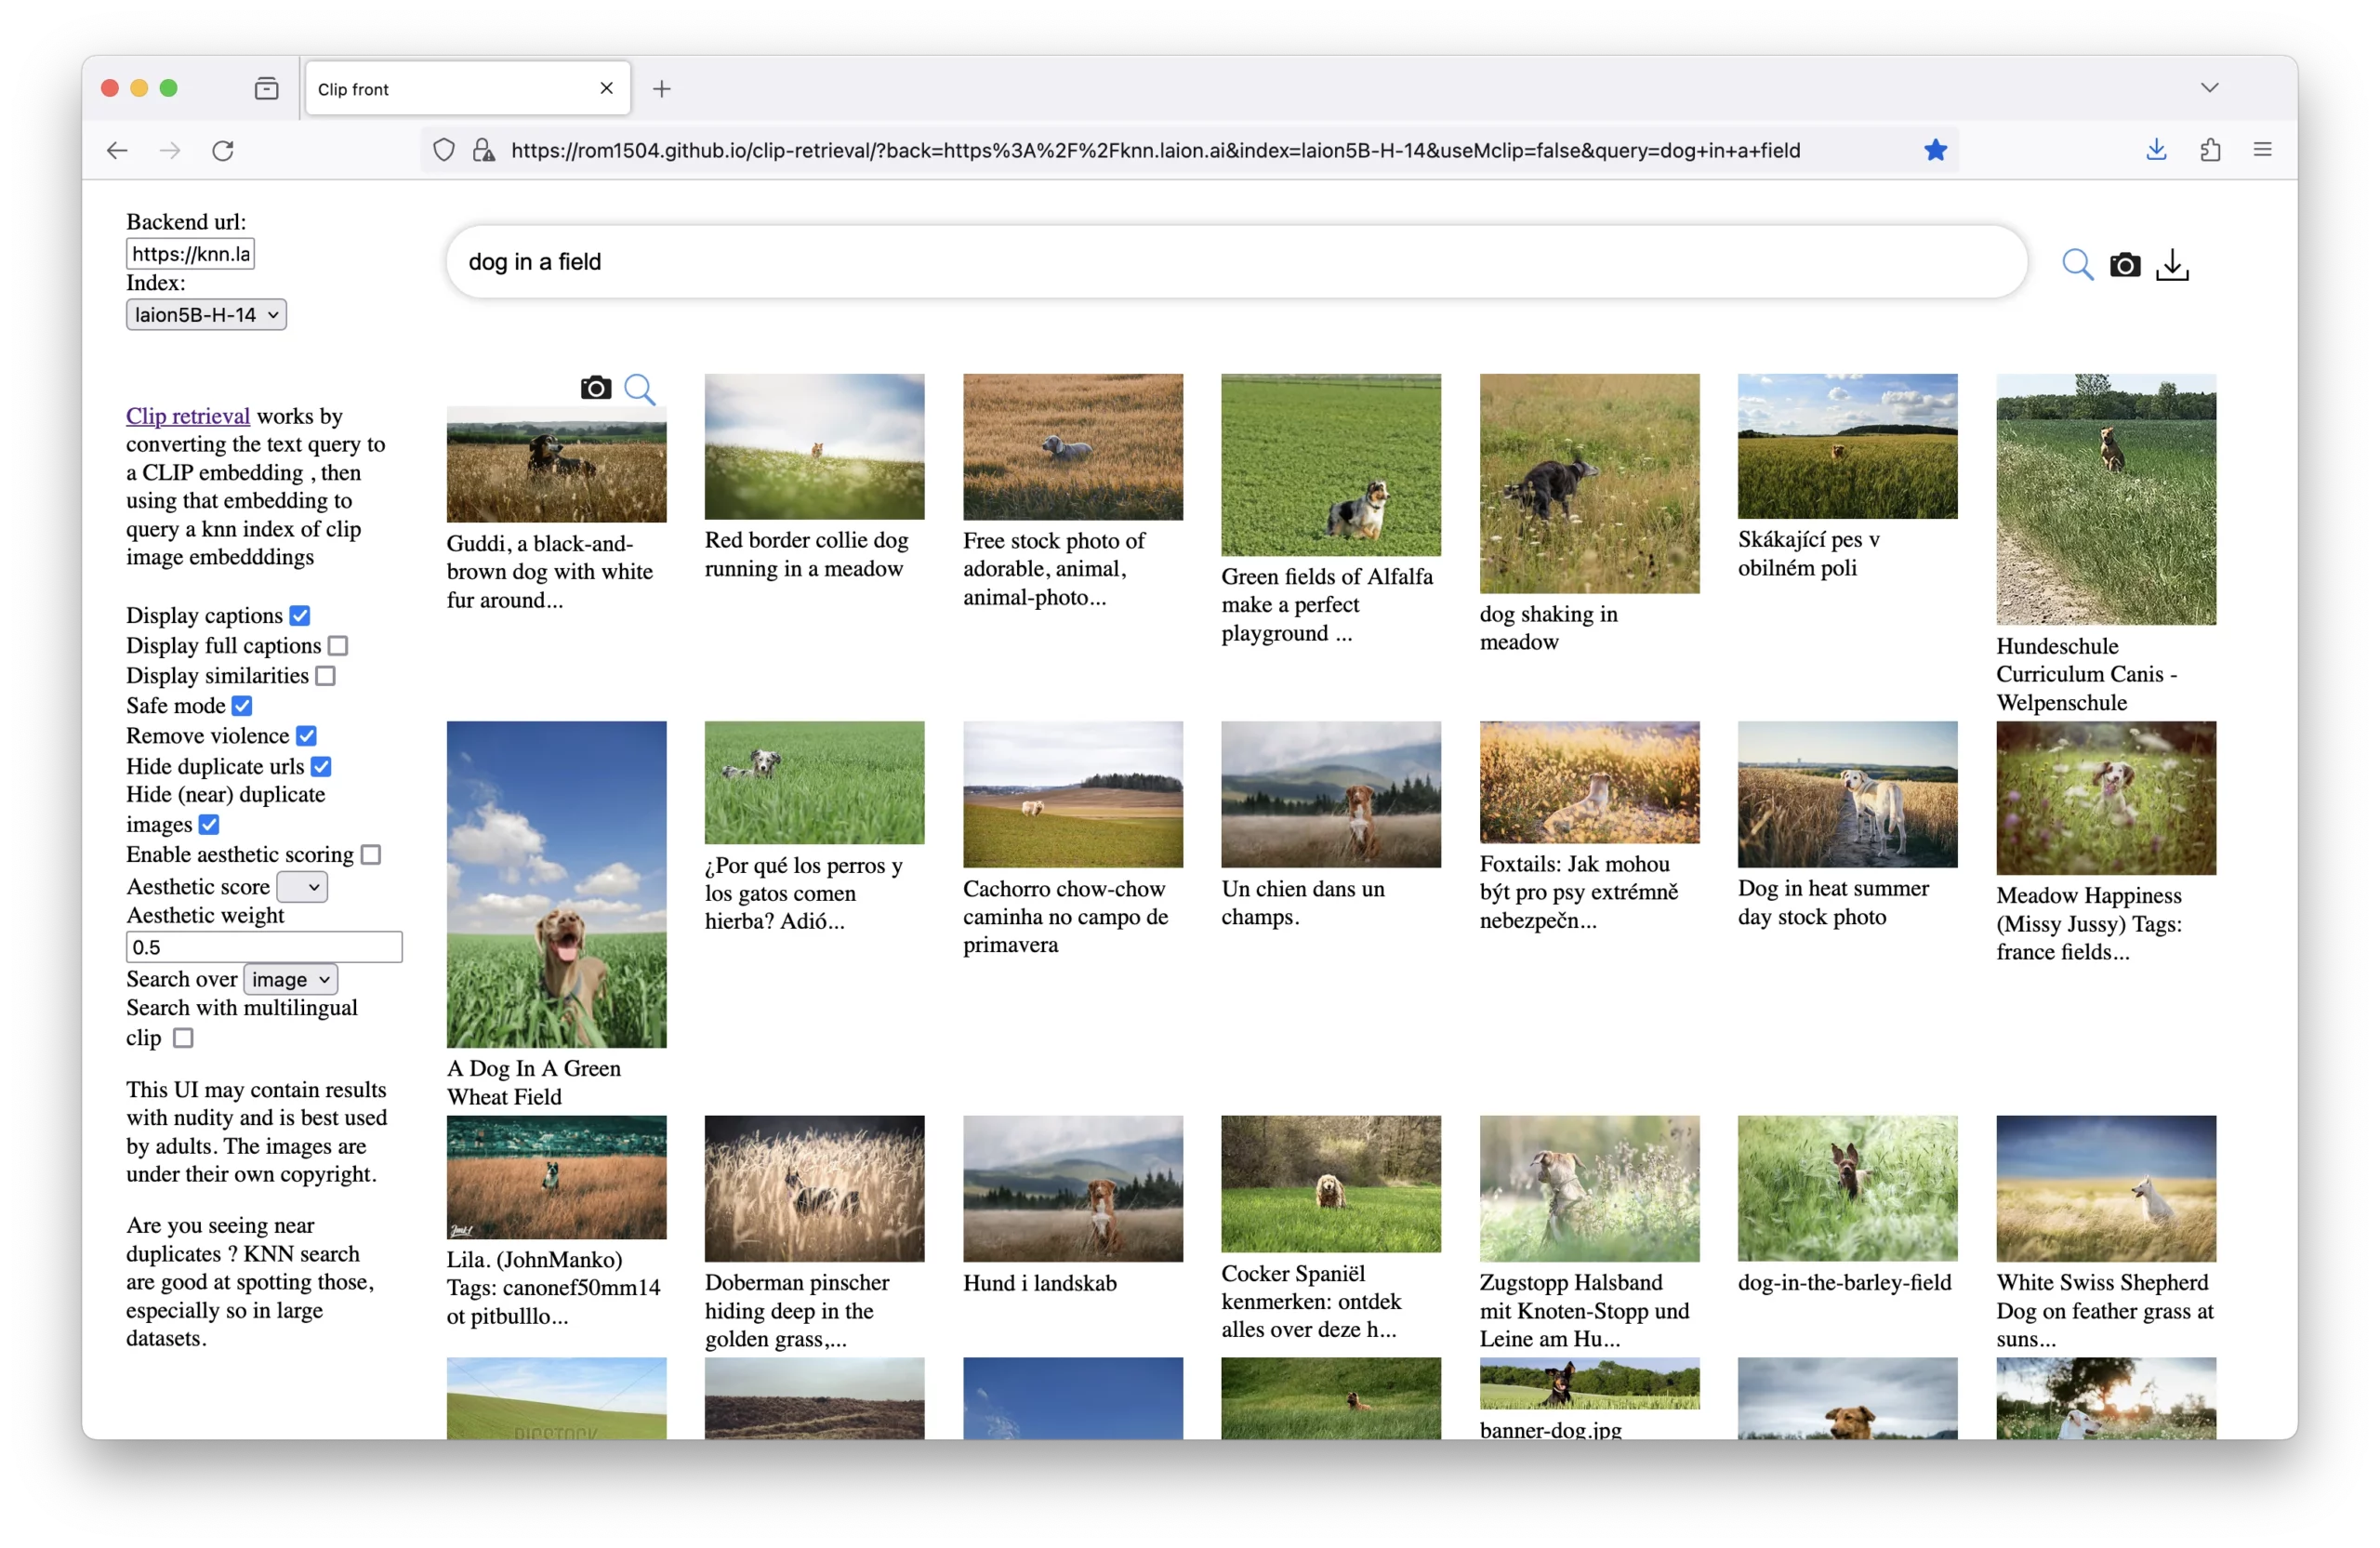 Before writing this article, I was trying to find a way to visually convey what is going on with CLIP models. I came across the incredibly helpful clip-retrieval repository. While this is primarily intended to build a CLIP retrieval system, the demo site available here queries a dataset based on the term and returns images that match those terms.
This can give you an idea of how a CLIP model understands features within images and the kind of visual information it associates with specific terms. By inputting different terms into the demo, you can see which images the model retrieves and how it perceives the relationships between words and visual content.
Prompt Fundamentals
Now that we have an idea of what is going on behind the scenes, here are some general guidelines that you should consider before typing the first word into the prompt box.
1. Know the CLIP Model
As we discussed at length, how you construct your prompt should be tailored to the CLIP model’s strengths. Understand whether the model prefers succinct or elaborate prompts and get into specific details if needed.
When using fine-tuned models, look at the examples that the creator has provided to get a sense of how the model interprets prompts.
2. Be Specific
As the old adage goes, a picture can say a thousand words, but you only have about 75 to get the job done. You need to be precise in your language to direct the model accurately.
Do you mean to say the photo is ‘a girl standing in a field’, or perhaps what you really meant was ‘a 25-year-old girl in a yellow sundress standing in a sunny field of wildflowers during the golden hour’? Both would create vastly different images, and the more specific you are, the closer the result will be to your vision.
3. Prompt Position
Stable Diffusion models give more weight to the tokens at the start of the prompt, which means that the most important concepts should be introduced early on.
You can test the position of the prompt if you are using Automatic1111 WebUI. Within the XYZ Script, the Prompt Order option allows you to test different positions of the prompt.
For example, here we change the order of a few words in the prompt and can see how changing the first word affected the lighting of the subject in the image:
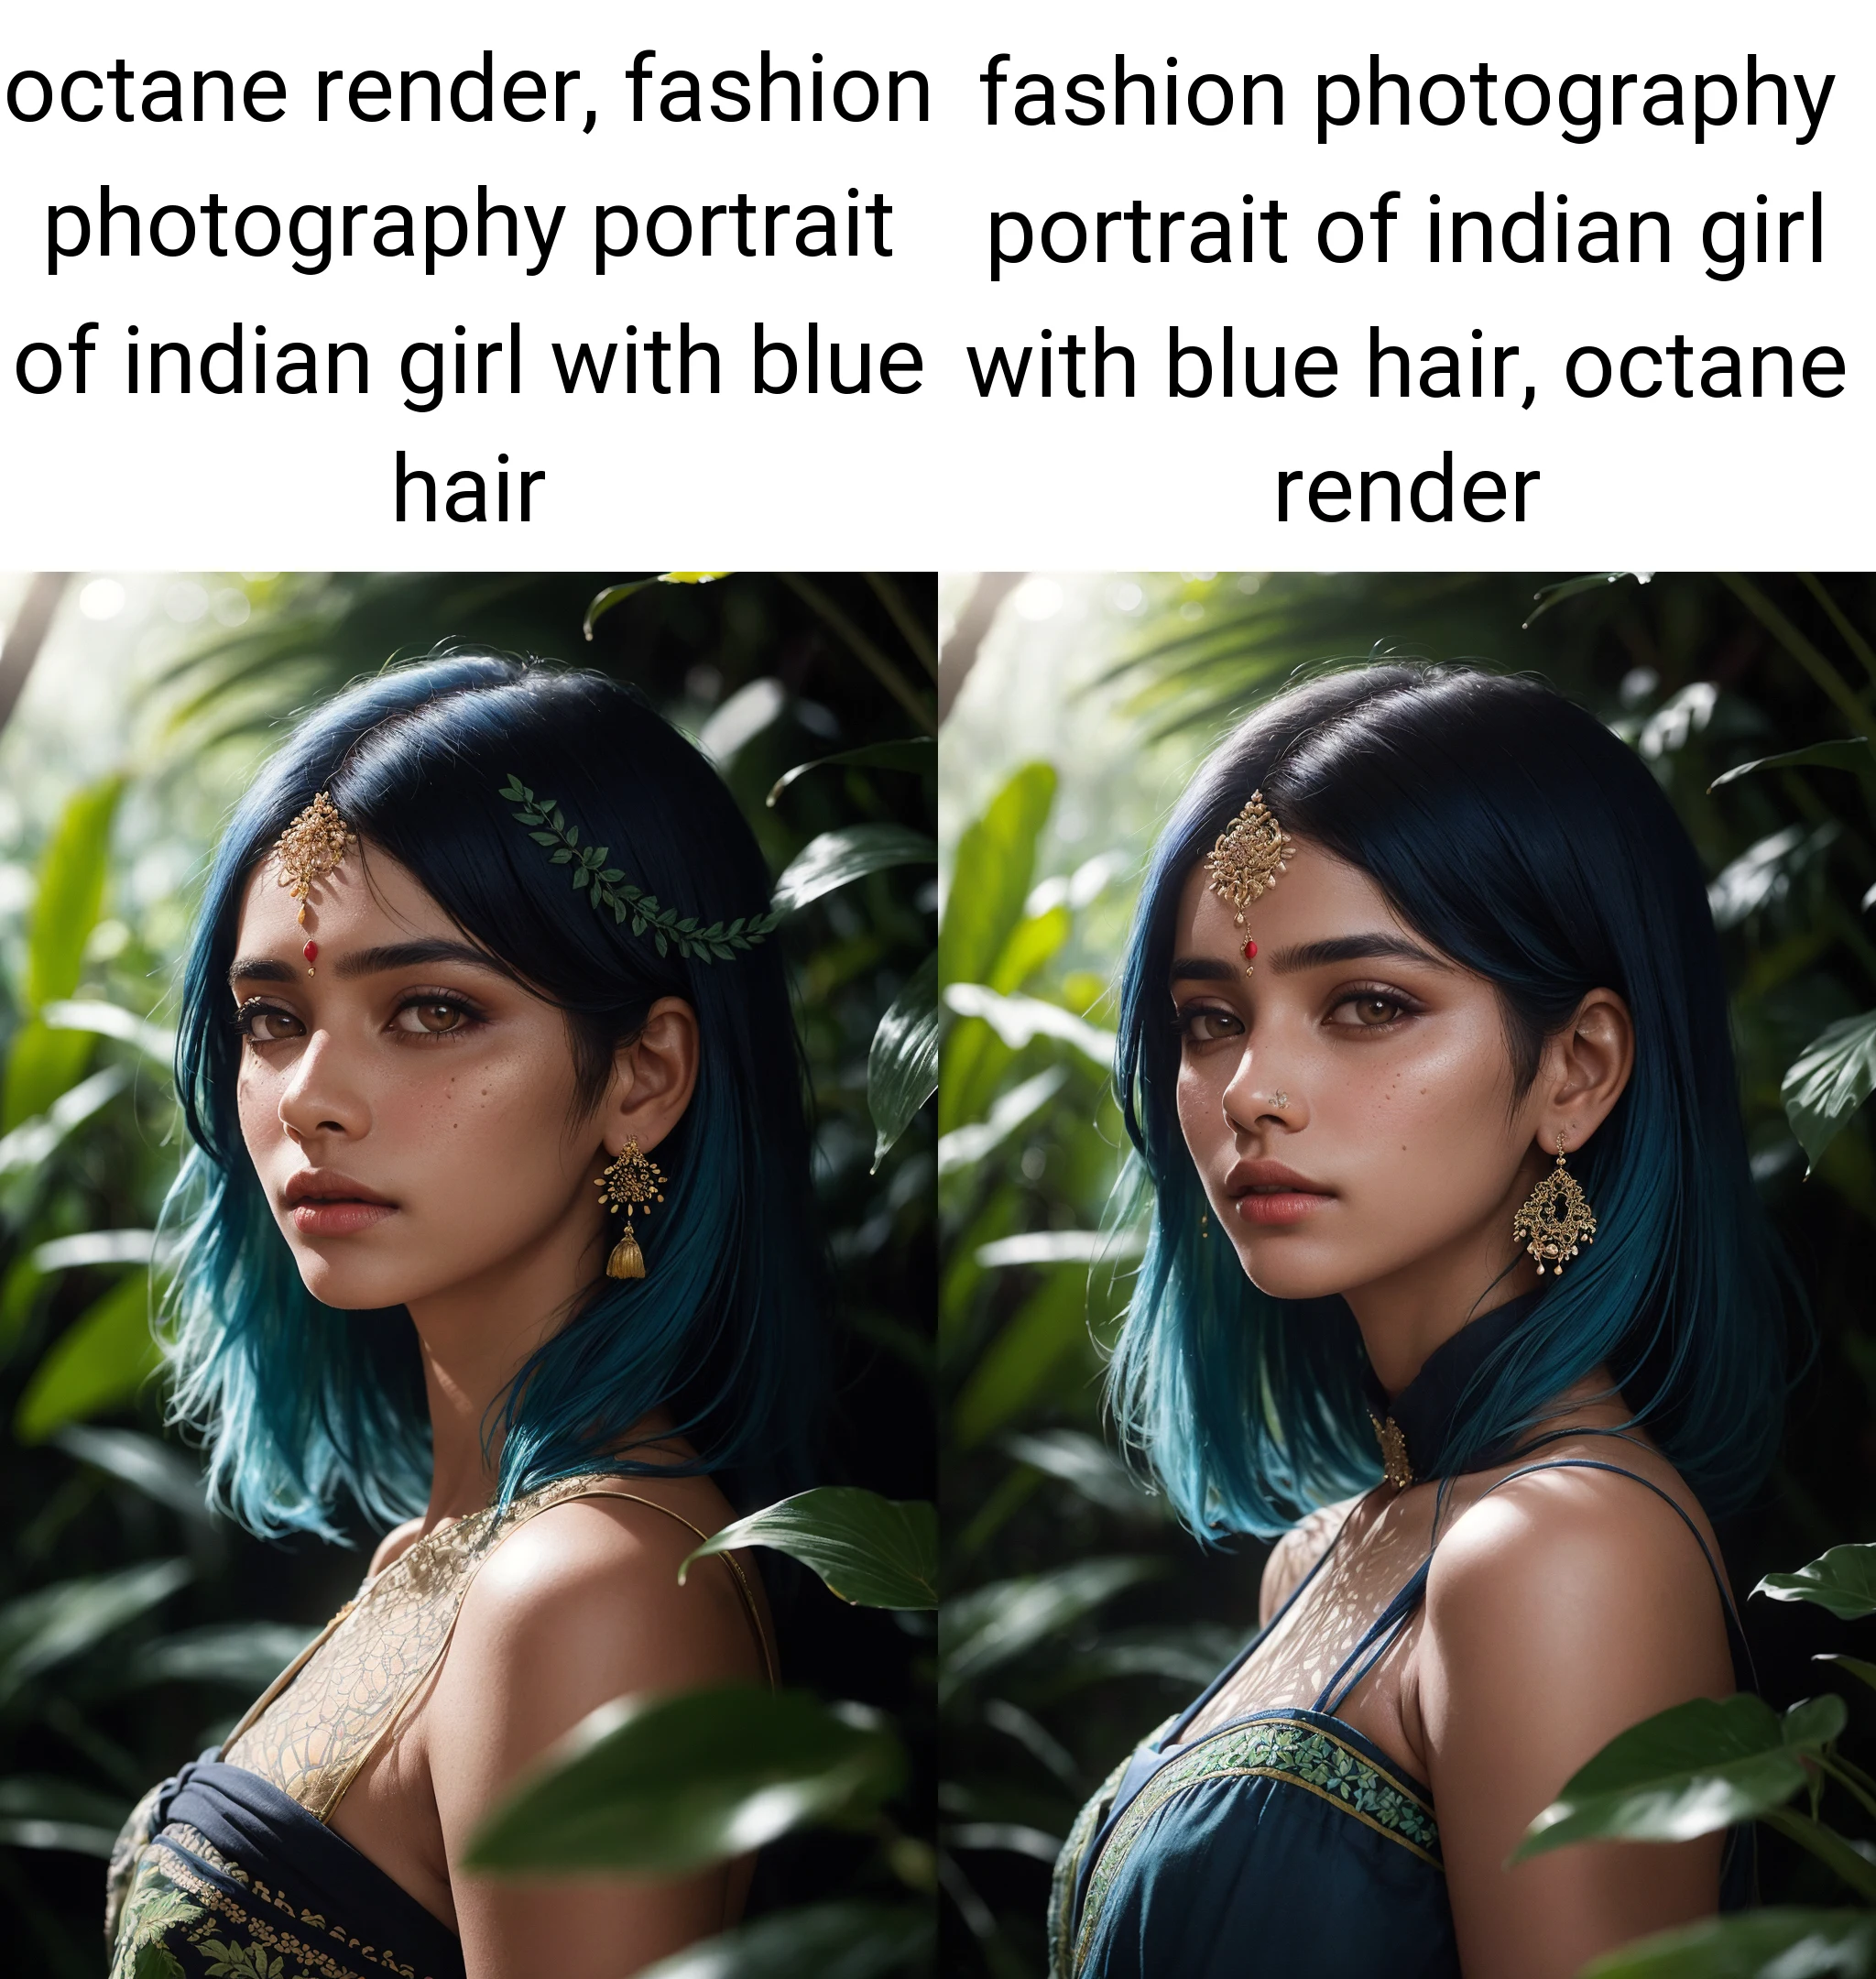 Source image: https://civitai.com/images/1778544. See how her face has much different lighting by just moving the words around.
4. Prompt Emphasis
Surrounding your term or terms in parentheses (), {}, and [] will change the emphasis of the prompt. Specifically, () will give the term a factor of 1.1 more weight, while {} will increase it by 1.05, and [] will reduce the emphasis by 1.1.
What does this mean when creating a prompt?
Here we will use the XYZ Script Prompt S/R feature to demonstrate how the term ‘sunlight passing through foliage’ will be interpreted differently depending on the emphasis:
 The difference is subtle, but the lighting in the upper left changes slightly. Click to view full-resolution.
The complete prompt is as follows: cat in a wizard hat, in lush jungle with flowers, 3d render, cgi, symmetrical, octane render, 35mm, (intricate details:1.12), hdr, (intricate details, hyper detailed:1.15), detailed, sunlight passing through foliage, India
The Automatic1111 WebUI repository has a good write-up on this if you want to learn more.
5. Understand Composition
Photos can be broken down into core components. This includes the subject, lighting, camera angle, background, mood, room type, season, camera type, lens focal length, and depth of field, among others. Think of your prompt in sections and address each component as needed.
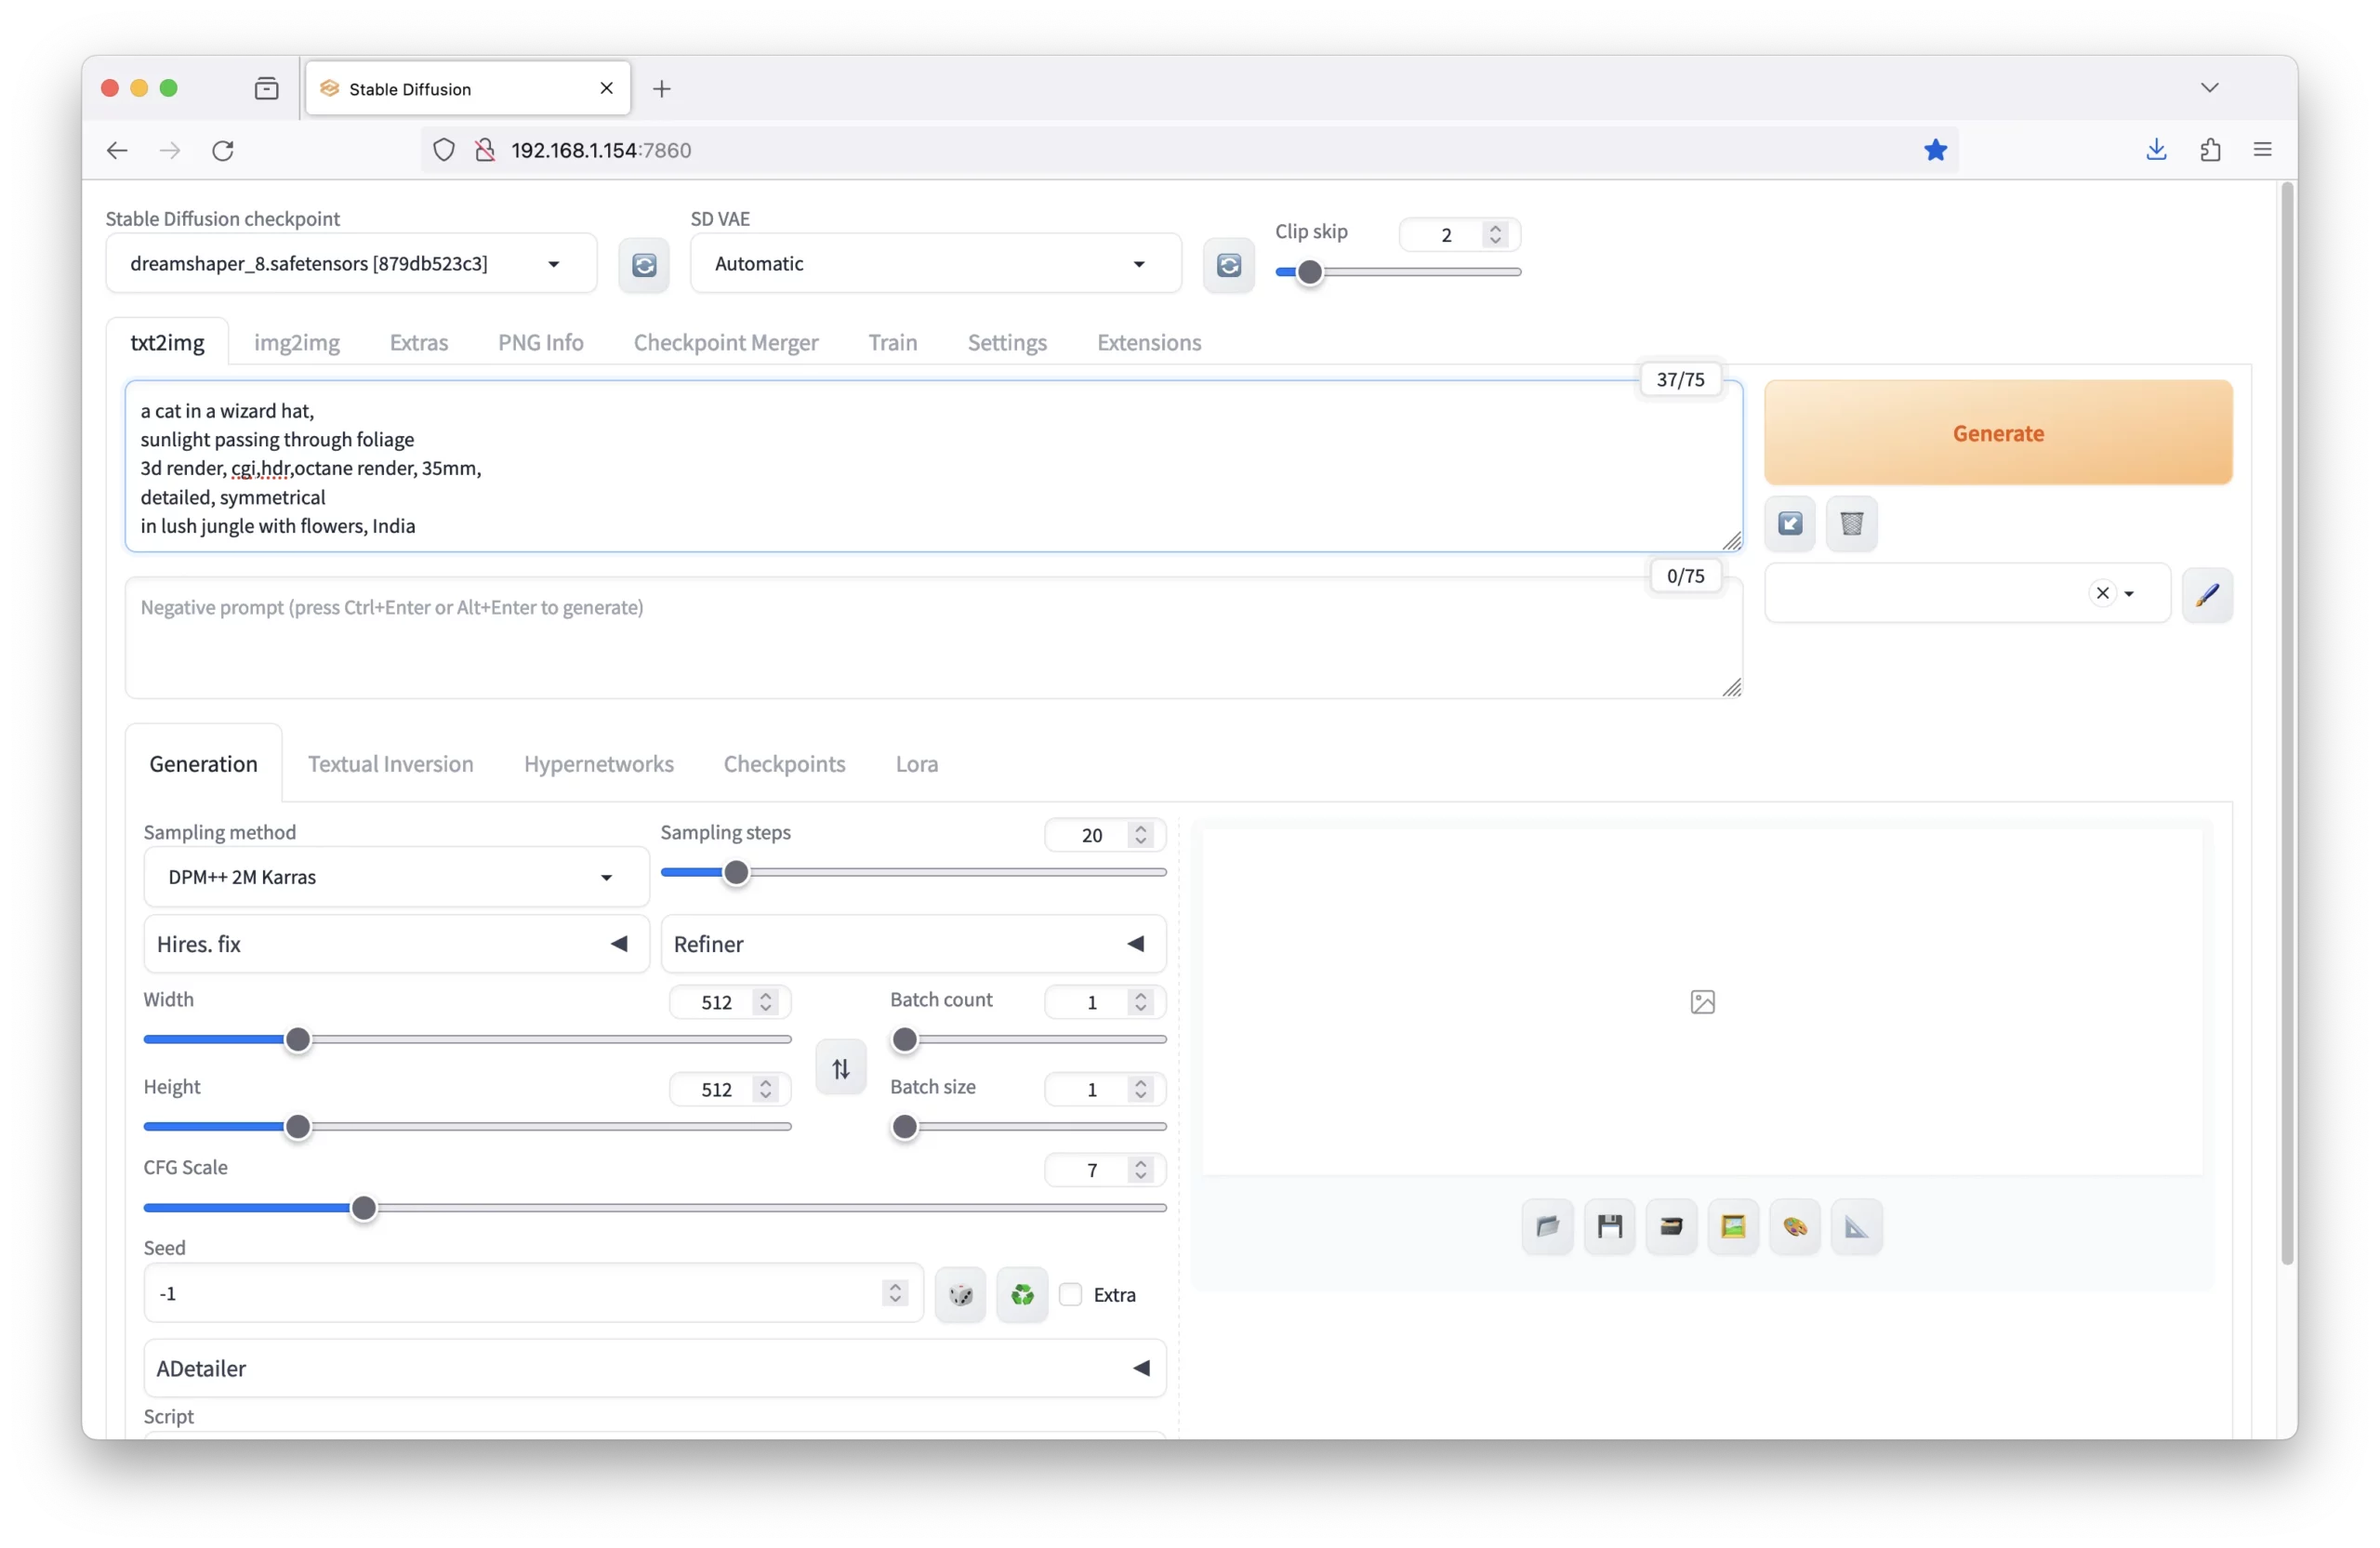
One way to approach this is by simply using a multi-line approach and have it as the following:
Subject: a cat in a wizard hat, Lighting: sunlight passing through foliage Camera: 3d render, cgi,hdr,octane render, 35mm, Composition: detailed, symmetrical Environment: in lush jungle with flowers, India
Of course, make sure you remove the terms ‘Subject’, ‘Lighting’, etc., from the prompt before submitting it.
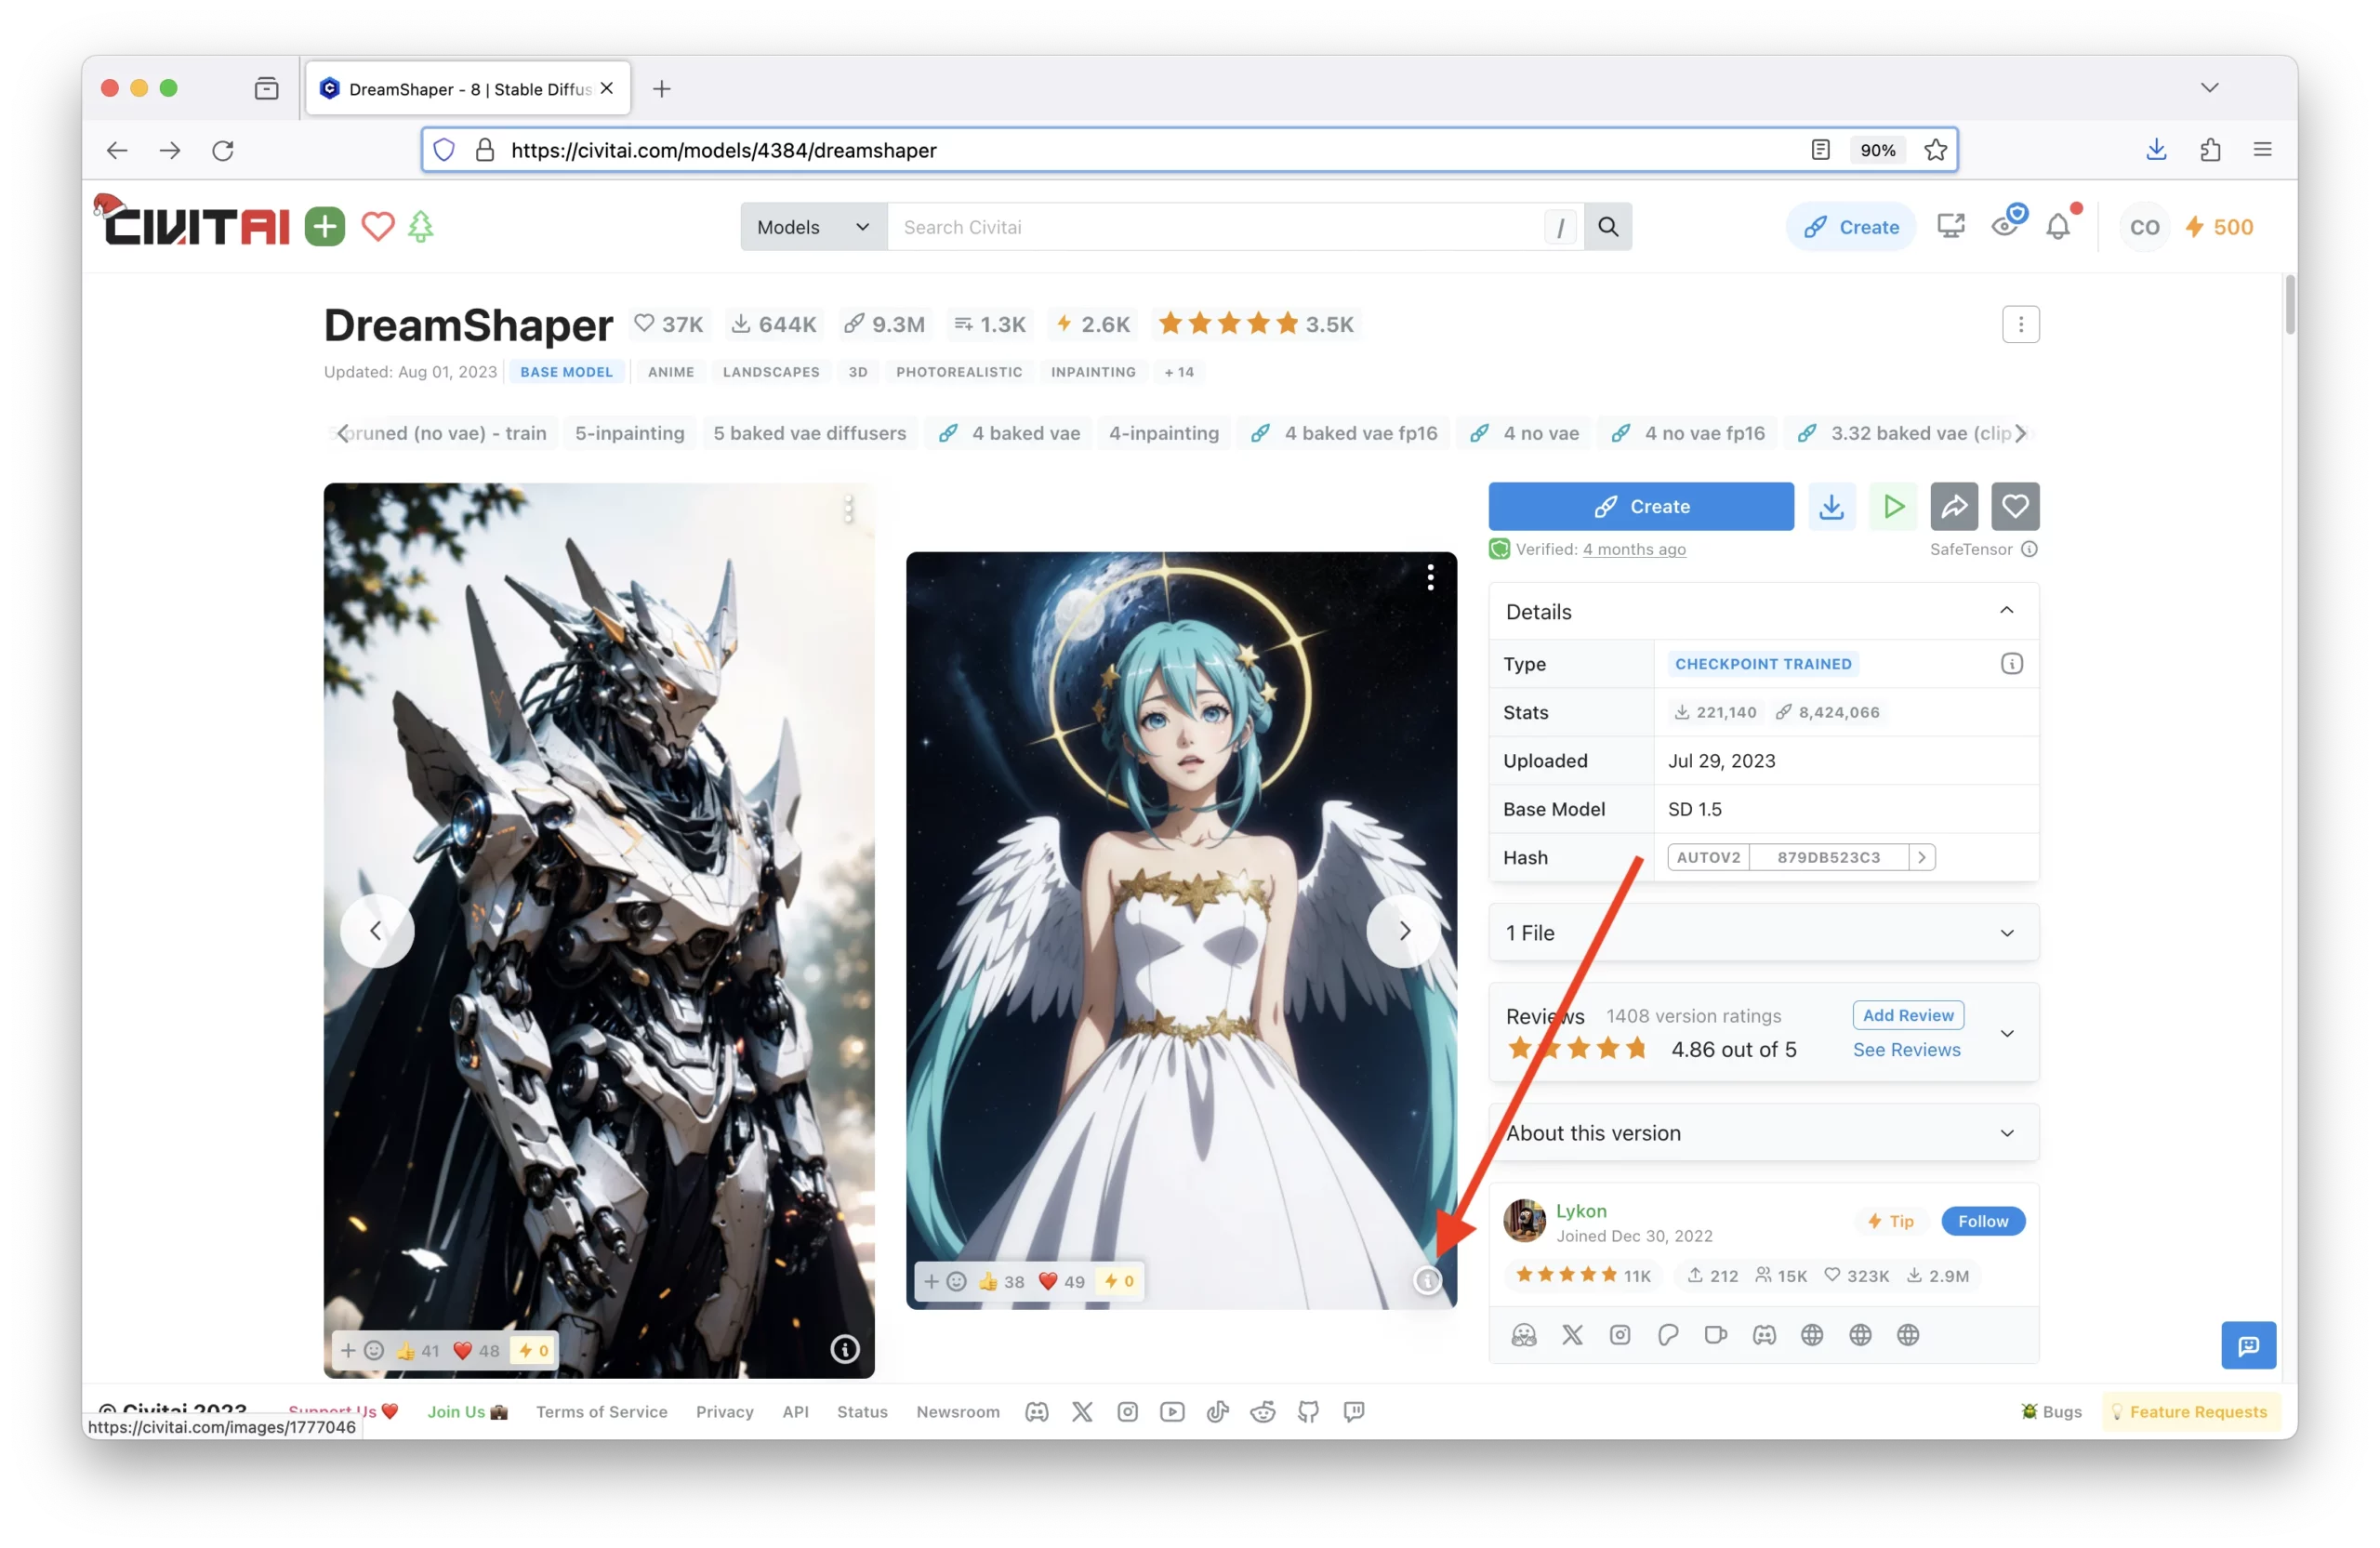
6. Copy Prompts from Civitai
If you are using a fine-tuned model from Civitai, then you can easily copy the prompts from the model’s page and paste them into the prompt box. This is a great way to get started and adapt to a previous creation.
For example, the DreamShaper model is terrific at generating various types of art. Click on any image that contains an ‘i’ in the bottom-right corner:
 Then click on the ‘Copy Generation Data’ button:
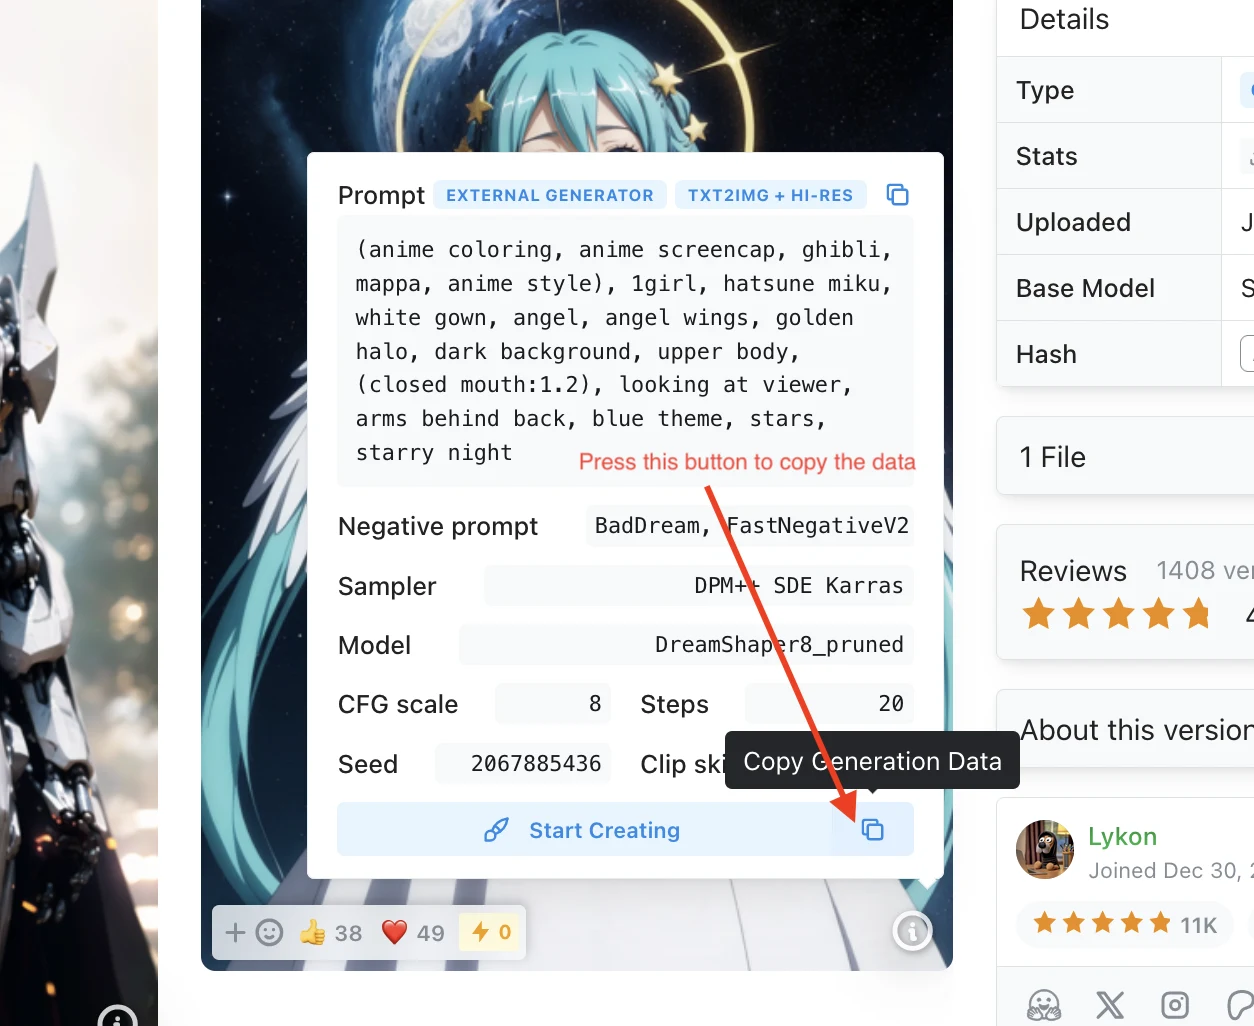 Once copied to your clipboard, paste it into Automatic1111 WebUI prompt box, then click the ↙️ button to expand the prompt:
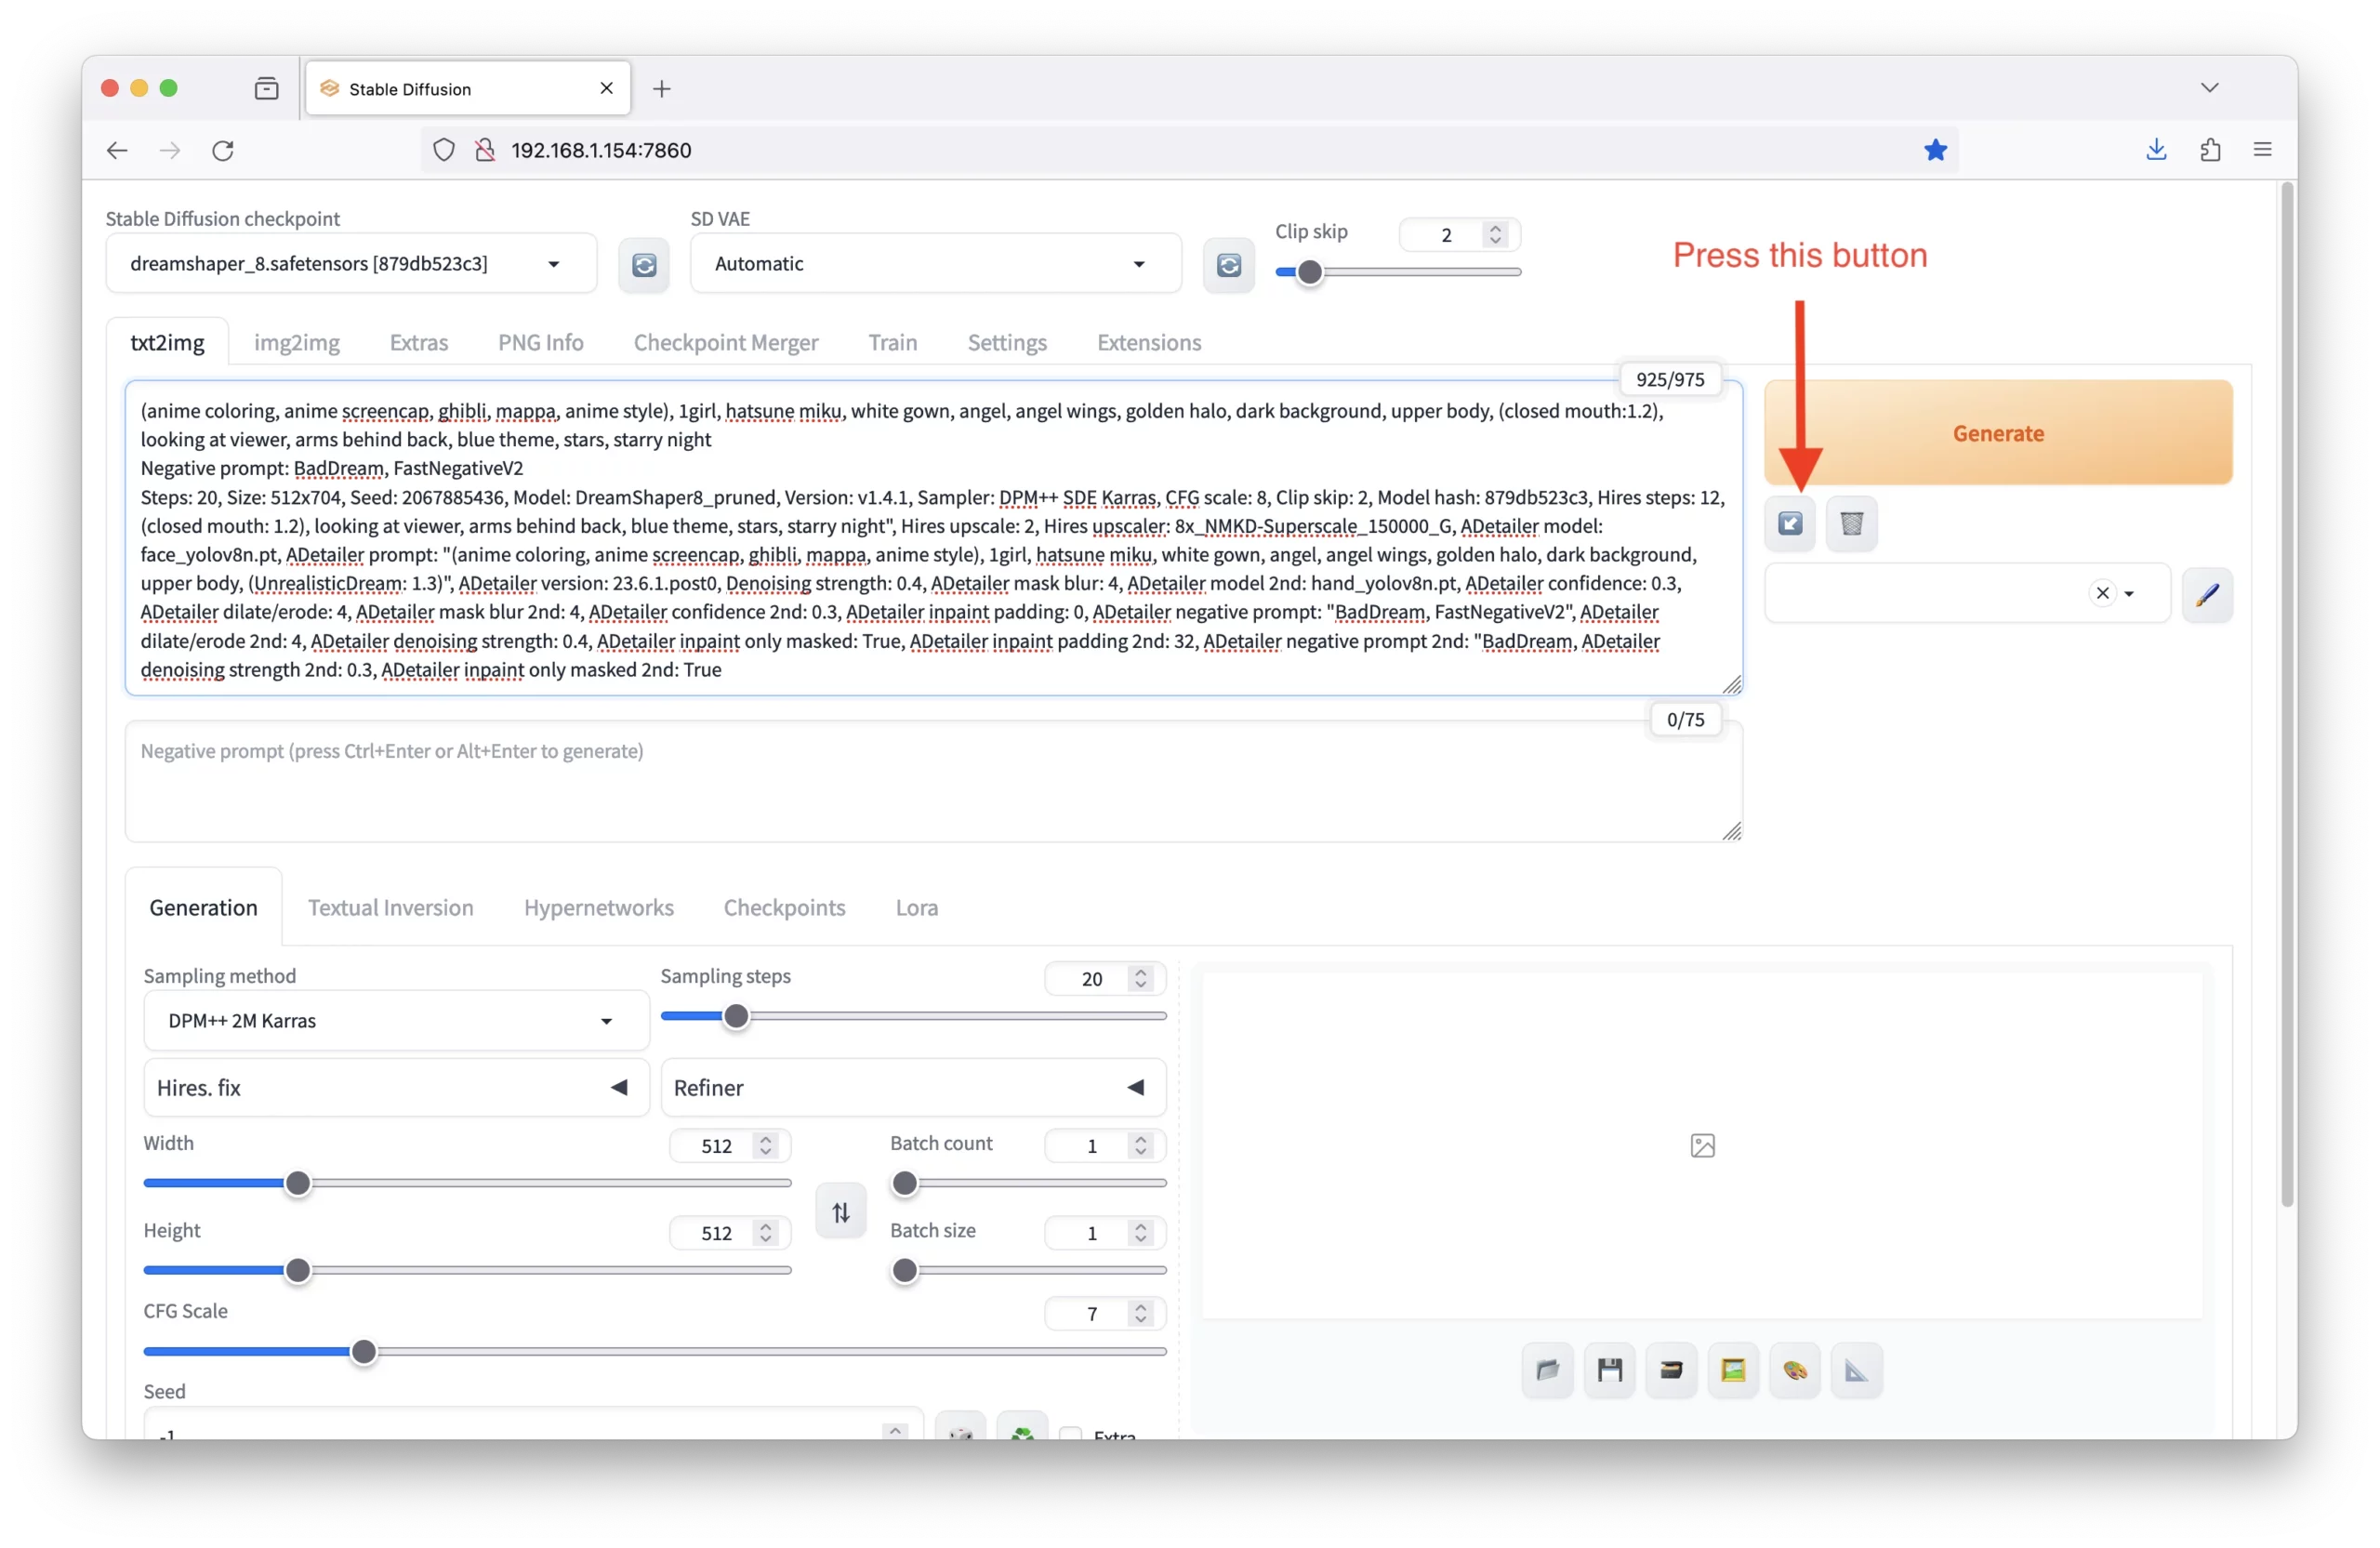 This will auto-fill all the details for you. You can then edit the prompt as needed or generate the same image on your own machine:
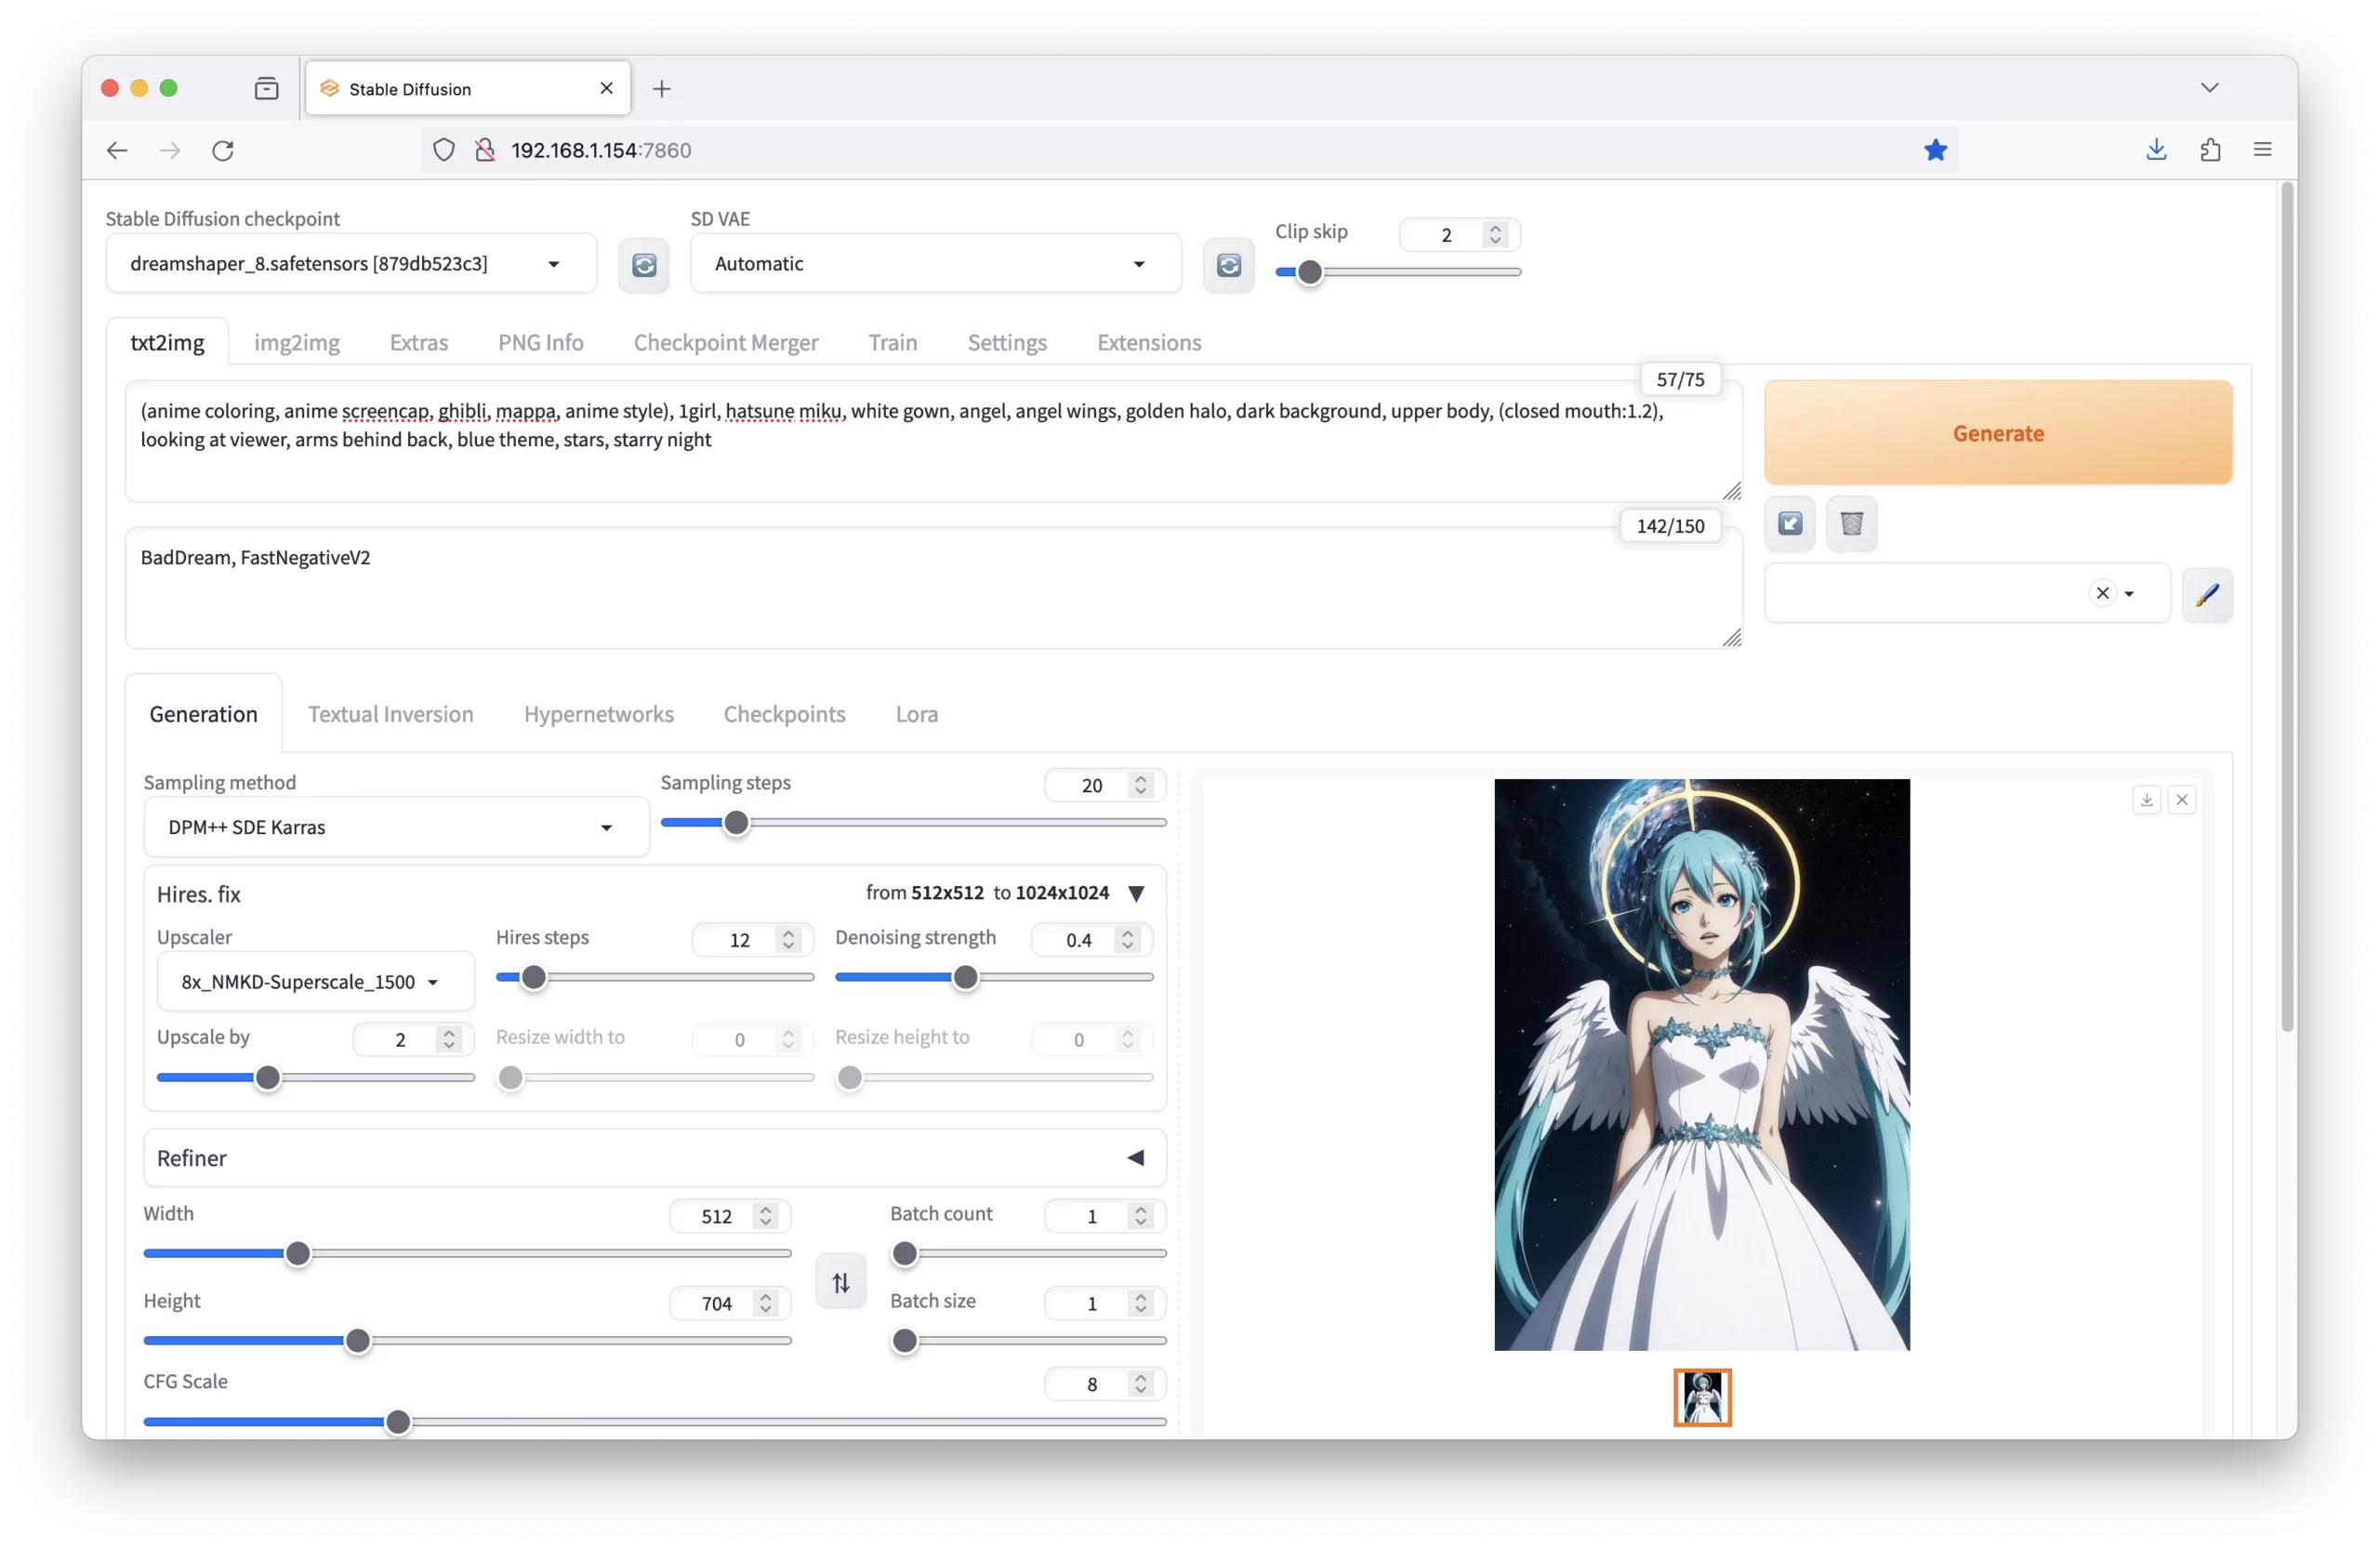 Note: Many images may contain LoRAs or Textual Inversions, which are separate files you’ll need to download to generate the image.
Want More AI Image Tutorials?
Get the best AI image tutorials and tool reviews—no spam, just 1 or 2 helpful emails a month.
Continue Learning
More How It Works Tutorials
Explore additional tutorials in the How It Works category.
View All Tutorials