How to Create Storyboards Using Fully Open-Source AI Image Tools
You'll storyboard faster with open-source AI image tools. In this hands-on guide, you use Qwen Image Edit in ComfyUI to keep characters consistent, iterate scenes with batch prompts, and lock poses with ControlNet, with an optional WAN 2.2 pass for motion. Download the workflow and start crafting cinematic boards in minutes.
What You'll Learn
This tutorial shows how to build complete storyboards using fully open-source AI image tools, centering on Qwen Image Edit inside ComfyUI. You'll learn to set up models, LoRAs, and constants; use character and scene reference images; write batch prompts; and apply ControlNet for precise poses, with optional WAN 2.2 image-to-video. The article includes a downloadable workflow and a video walkthrough to accelerate your process.
Video Walkthrough
Prefer watching to reading? Follow along with a step-by-step video guide.
Storyboarding with Open Source Models
How to Create Storyboards Using Fully Open-Source AI Image Tools
Storyboarding is an essential part of the creative process. It allows you to quickly iterate on ideas and deliver the right message before committing to final production. In this tutorial, I'll show you how to create a complete storyboard using Qwen Image Edit and ComfyUI—entirely with open-source tools.
📺 Prefer video? Watch the full tutorial on YouTube
Download the Workflow: This entire ComfyUI workflow is available for free on our workflows page.
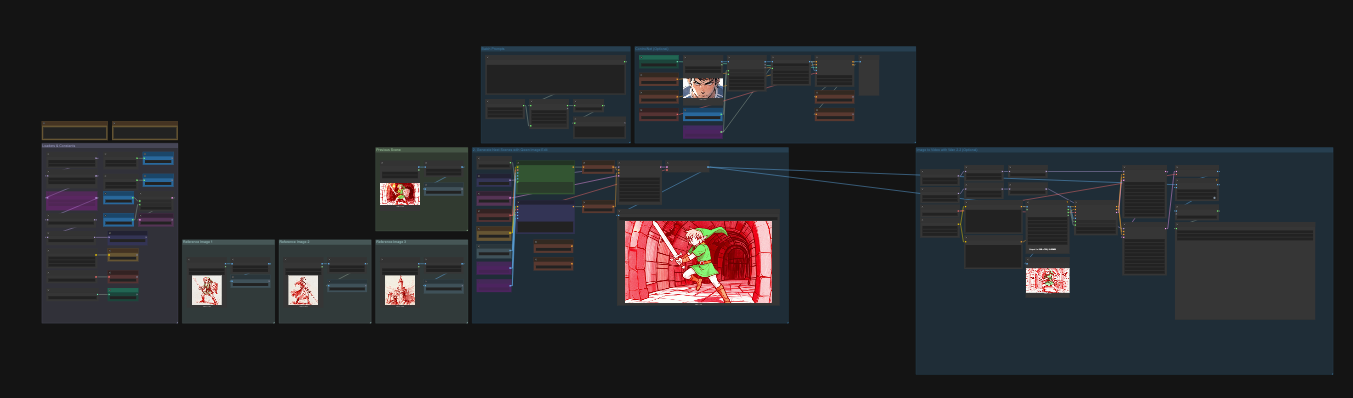
Workflow Overview
Before diving into the details, let's look at the overall structure. The workflow is organized into several logical groups:
-
Loaders & Constants – Where we load all necessary models and set hard-coded values referenced throughout
-
Reference Images – Up to three character/scene reference images for Qwen Image Edit
-
Previous Scene (Optional) – Feed a generated image back as a reference for continuity
-
Batch Prompts – Your story prompts, one line per scene
-
ControlNet (Optional) – Direct pose or composition when needed
-
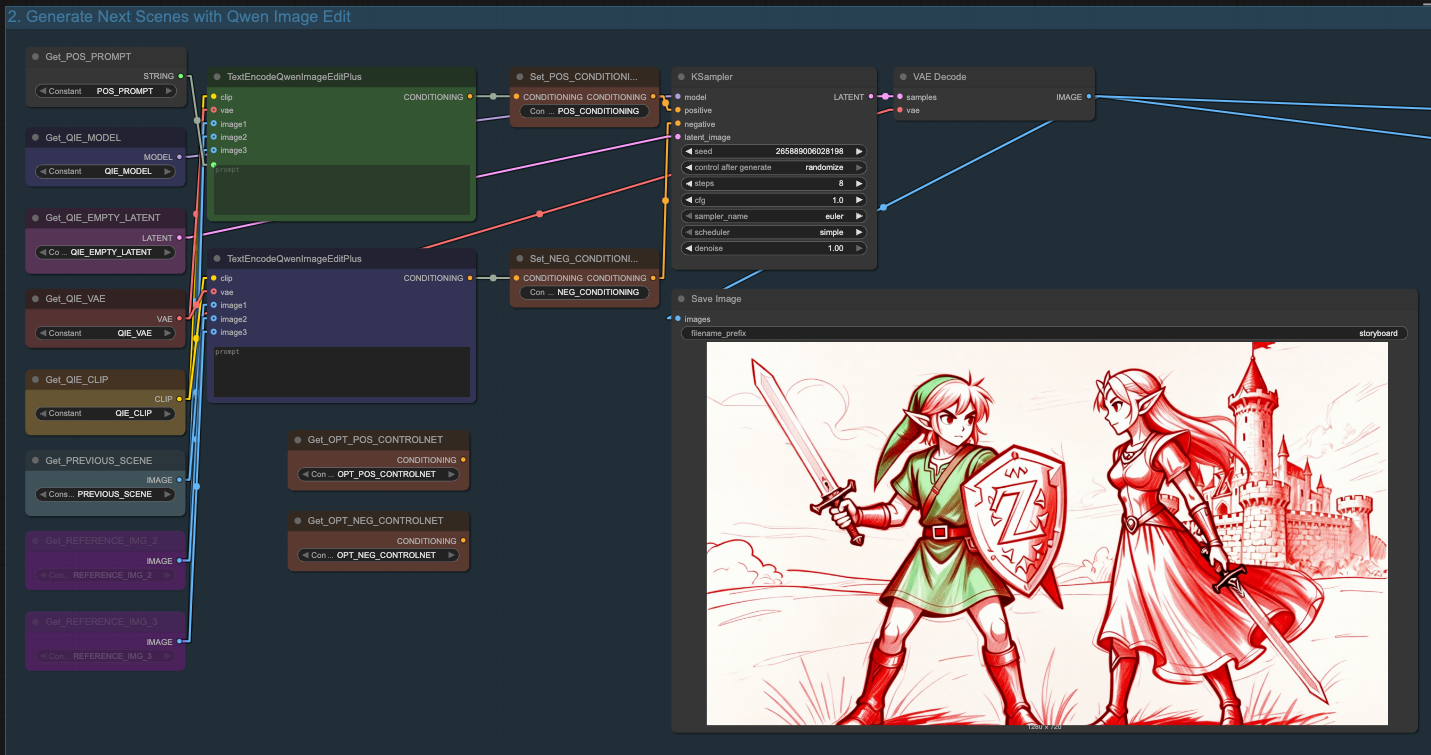
Qwen Image Edit – The core node that generates your storyboard frames
-
WAN 2.2 Animation (Optional) – Bring your storyboard to life with image-to-video
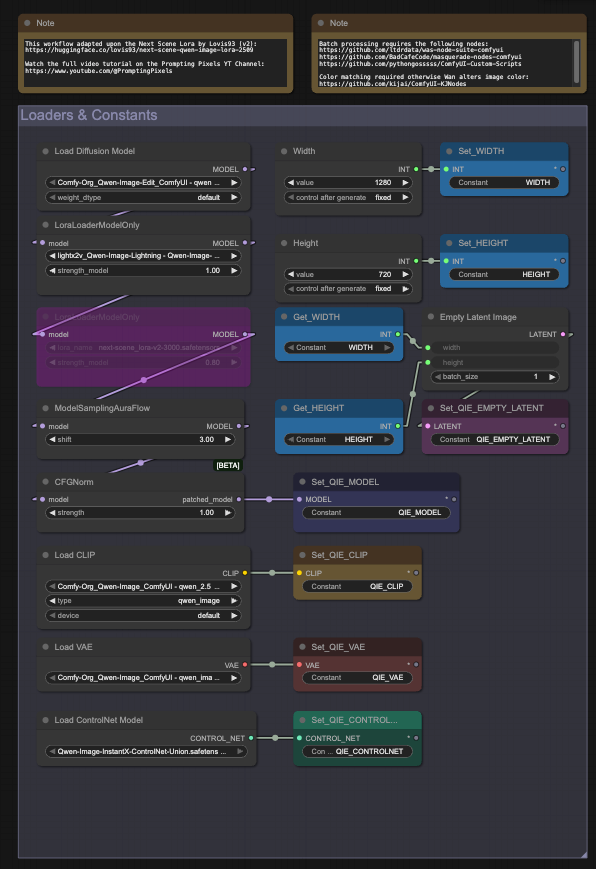
Step 1: Configure Your Loaders and Constants
Start by setting up your base configuration in the Loaders & Constants group - the provided workflow should be good for most use cases and won't require much for adjustments.
Key settings to note:
-
Resolution: I'm using 1280x720 as it gives a nice widescreen cinematic look and will have no problem should I want to turn this into a video storyboard with WAN 2.2. You could use any of the supported resolutions for Qwen Image Edit (2509) such as 1024x1024 if you prefer square output.
-
Next Scene LoRA (Optional): Useful for realism projects where you want camera movements or composition changes between shots. We'll bypass this for our stylized example.
-
Models: This includes Qwen Image Edit (2509), Text Encoder & VAE, ControlNet, and an 8-Step Lightning LoRA.
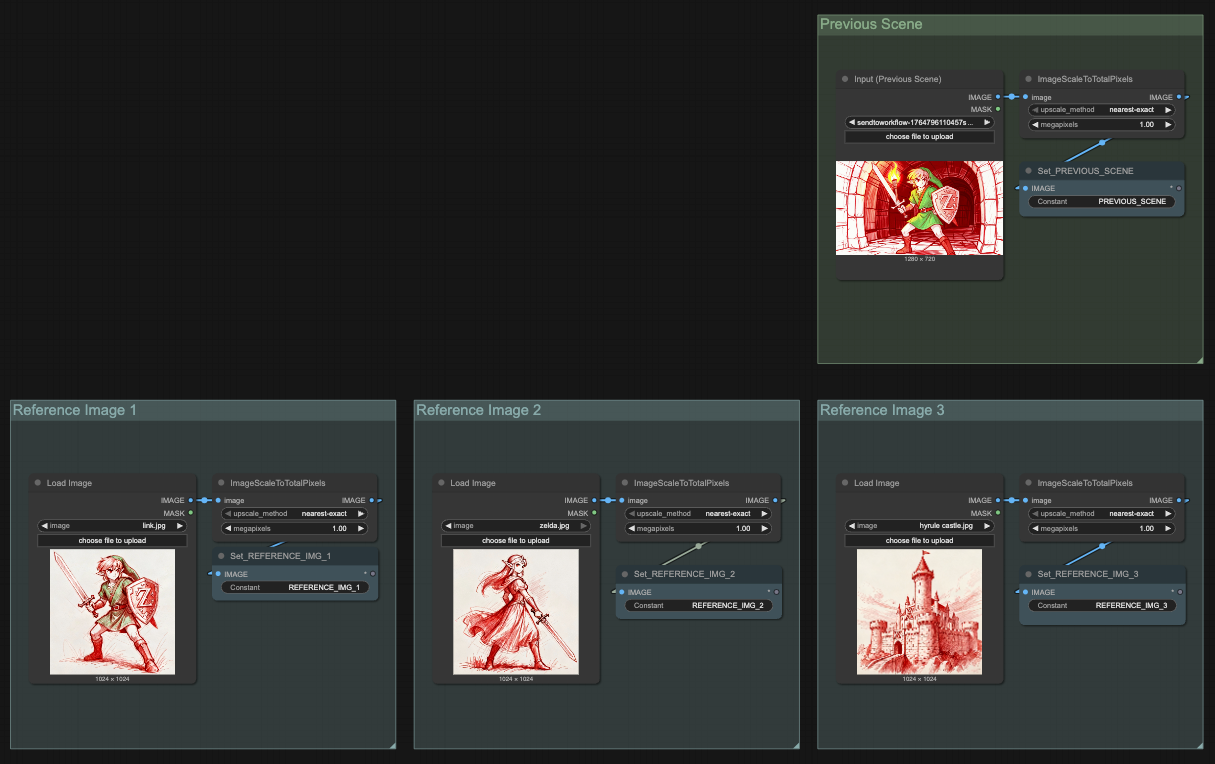
Step 2: Set Up Your Reference Images
Qwen Image Edit can accept up to three reference images. This is perfect for scenes with multiple characters or when you need consistent visual references.
For this tutorial, I'm creating a simple Legend of Zelda-inspired story with two characters:
-
Reference Image 1: (Subject 1) Link
-
Reference Image 2: (Subject 2) Zelda
-
Reference Image 3: (Object Reference) Hyrule Castle
-
Previous Scene: If we want to change the composition but maintain setting
The story follows Link and Zelda talking outside Hyrule Castle, then Link goes on an adventure to a cave, fights a bat, and discovers treasure.
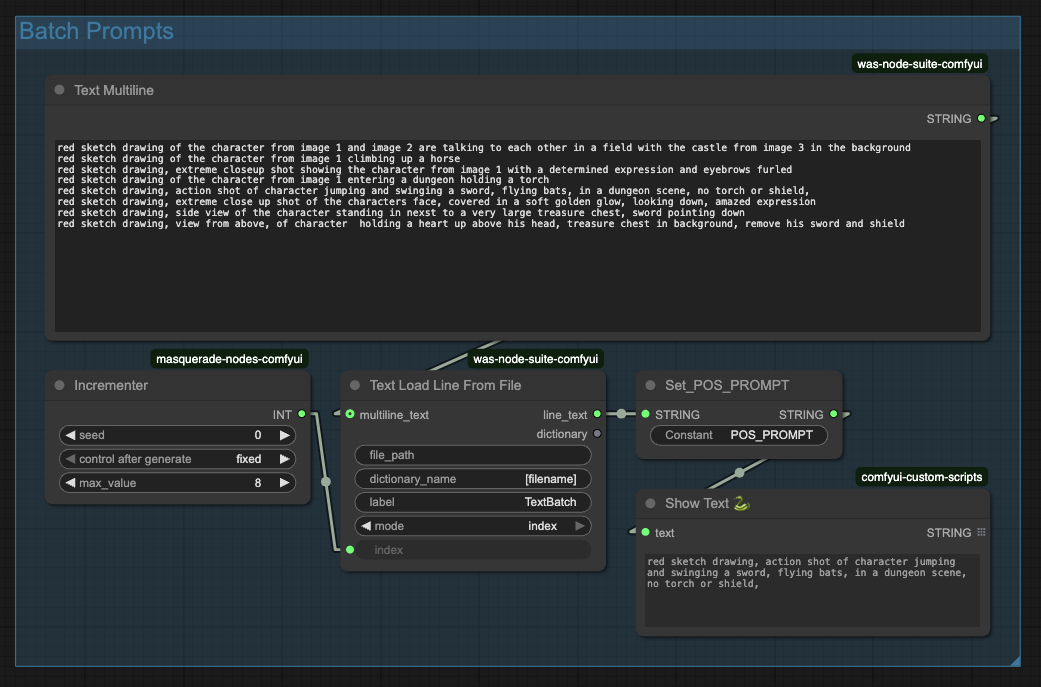
Step 3: Write Your Scene Prompts
The Batch Prompts group contains your entire story, one scene per line. Keep your prompts relatively short since we're making incremental edits with Qwen Image Edit.
Example prompts from this tutorial:
red sketch drawing of the character from image 1 and image 2 are talking to each other in a field with the castle from image 3 in the background
red sketch drawing of the character from image 1 climbing up a horse
red sketch drawing, extreme closeup shot showing the character from image 1 with a determined expression and eyebrows furled
red sketch drawing of the character from image 1 entering a dungeon holding a torch
red sketch drawing, action shot of character jumping and swinging a sword, flying bats, in a dungeon scene, no torch or shield,
red sketch drawing, extreme close up shot of the characters face, covered in a soft golden glow, looking down, amazed expression
red sketch drawing, side view of the character standing in next to a very large treasure chest, sword pointing down
red sketch drawing, view from above, of character  holding a heart up above his head, treasure chest in background, remove his sword and shield
The workflow includes an incrementer node that lets you batch-generate all scenes by queuing ComfyUI multiple times, automatically advancing through each prompt line.
Personally, I find making manual increments much easier to manage as details like characters, setting, etc. are hard to batch process.
Step 4: Generate Your First Scene
With everything configured, generate your first image by simply pressing the "Run" button or "Cmd/Ctrl + Enter".
For the opening scene, I used both reference images (Link and Zelda) to establish the characters in front of Hyrule Castle.
Step 5: Using ControlNet for Specific Poses
Sometimes Qwen Image Edit struggles with specific expressions or poses. This is where ControlNet becomes valuable.
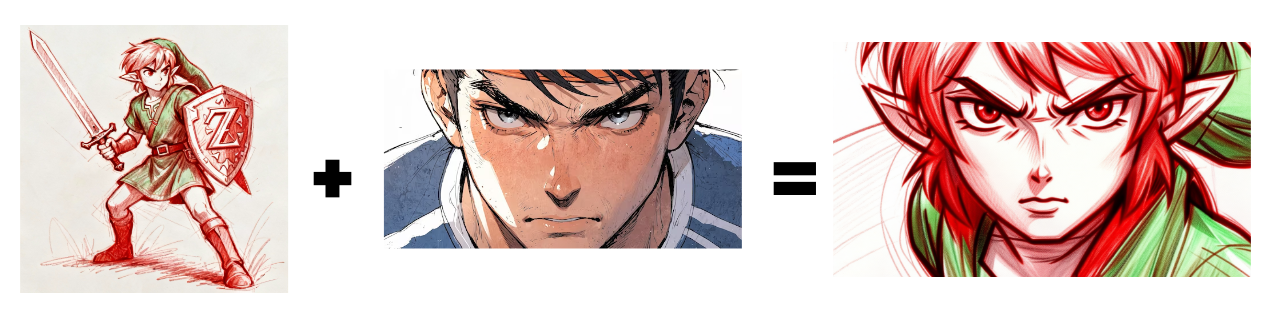
Example problem: I wanted a close-up of Link with a determined expression, but the initial generation wasn't capturing it.
Solution:
- Upload a reference pose/expression image to the ControlNet load image node

- Connect the ControlNet constants to the KSampler:
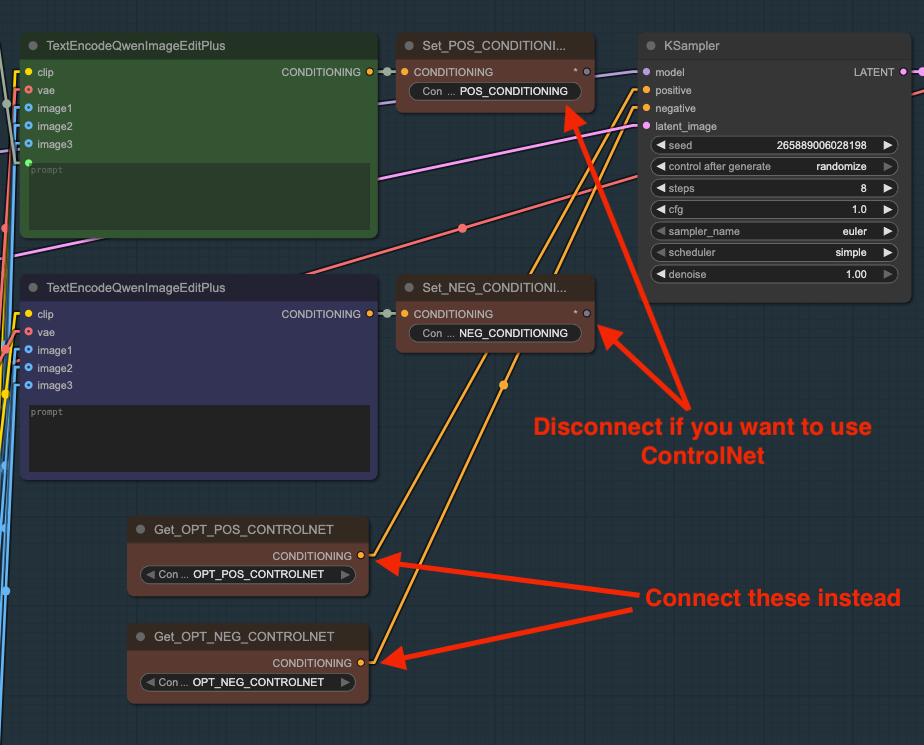
Then run the prompt. Then you'll get an image that looks like this:
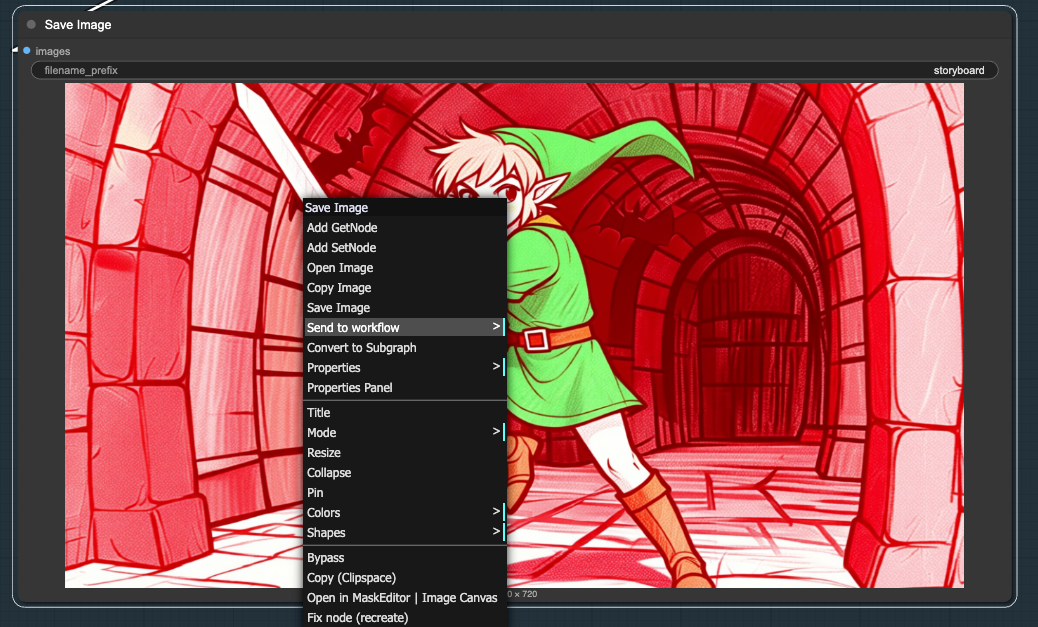
Step 7: Using Previous Scenes as References
For visual continuity, you can feed a generated image back as a reference for the next scene. By using the ComfyUI-Custom-Scripts node, you can right click on the resulting output image and then "Send to Workflow" that sends the image to the "Previous Scene" node:
This is particularly useful for:
-
Maintaining environment consistency
-
Carrying over lighting conditions
-
Keeping character positioning logical between cuts
Step 8: Troubleshooting Problem Generations
Not every generation will be perfect. In fact, trying to iterate on the same image without being specific in your positive and/or negative prompt can be frustrating.
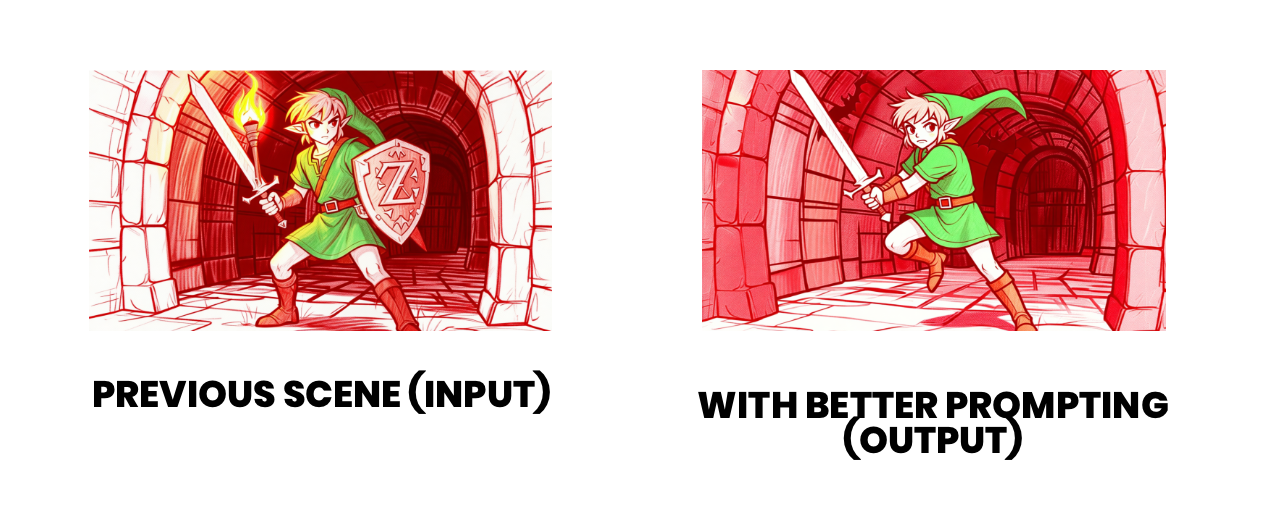
Here's how I handled a failed dungeon scene:
The problem: Link fighting bats wasn't rendering correctly—the model kept confusing the sword with a torch from earlier scenes:

The fix:
- Added negative prompts for "torch" and "shield"
- Updated the positive prompt to specify "character jumping and swinging a sword"
- This gave more dynamic action instead of the static reference pose
Don't be afraid to iterate. Sometimes you need to guide the model more explicitly with negative prompts or try different seeds.
The Final Storyboard
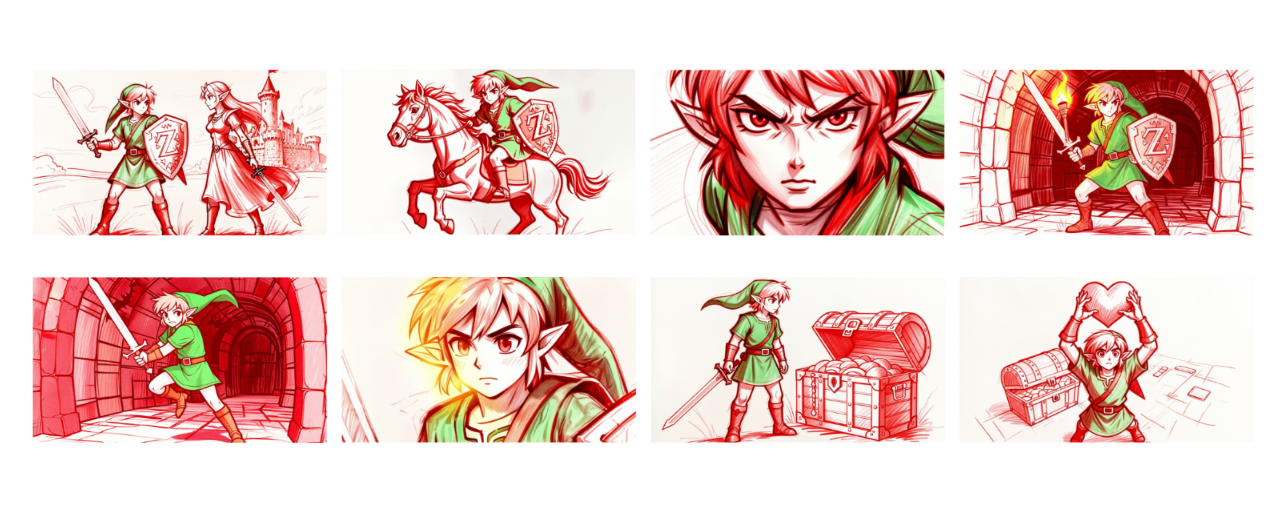
After working through all the scenes, here's the complete storyboard:
- Scene 1: Link and Zelda chatting outside Hyrule Castle
- Scene 2: He hops up on his horse
- Scene 3: He has a determined expression (ControlNet)
- Scene 4: Link entering the dungeon with a torch
- Scene 5: Link fighting bats in the dungeon
- Scene 6: Link discovers something glowing
- Scene 7: He realizes it's a treasure chest
- Scene 8: He claims his reward
Wrapping Up
Storyboarding with open-source AI tools like Qwen Image Edit and ComfyUI opens up rapid iteration possibilities that would have seemed impossible just a year or two ago. The ability to quickly visualize a story, make adjustments, and even animate the results—all locally and free—is a game-changer for creators.
Thanks for reading—see you in the next one!
Want More AI Image Tutorials?
Get the best AI image tutorials and tool reviews—no spam, just 1 or 2 helpful emails a month.
Continue Learning
More ComfyUI Tutorials
Explore additional tutorials in the ComfyUI category.
View All TutorialsReady-to-use workflow files
Get new workflows first
Be the first to get new ComfyUI workflows (1-2x/month, always free)